Hyundai Elantra (CN7): Maintenance / CABIN Air Filter
Filter Inspection
The cabin air filter should be replaced according to the Maintenance Schedule. If the vehicle is operated in severely air-polluted cities or on dusty rough roads for a long period, it should be inspected more frequently and replaced earlier. When you replace the cabin air filter, replace it performing the following procedure, and be careful to avoid damaging other components.
Filter replacement
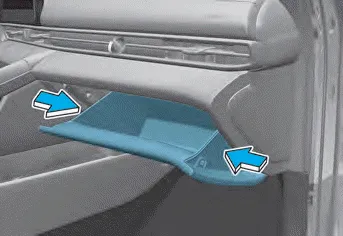
1. Push in both sides of the glove box as shown. This will ensure that the glove box stopper pins will get released from its holding location allowing the glove box to hang.
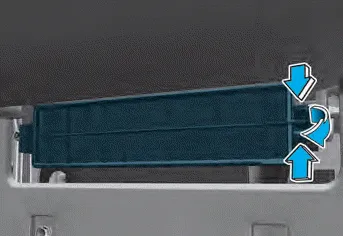
2. Remove the cabin air filter case while pressing the lock on the right side of the cover.

3. Replace the cabin air filter.
4. Reassemble in the reverse order of disassembly.
NOTICE
Install a new cabin air filter in the correct direction with the arrow symbol (↓) facing downwards, otherwise, it may be noisy and the effectiveness of the filter may be reduced.
Filter replacement The air cleaner filter can be cleaned for inspection using compressed air. Do not attempt to wash or to rinse it, as water will damage the filter.
Blade Inspection Contamination of either the windshield or the wiper blades with foreign matter can reduce the effectiveness of the windshield wiper functionality.
Other information:
Hyundai Elantra (CN7) 2021-2026 Service Manual: Head Lamp Leveling Device
Components and components location Component Location1. Head lamp leveling actuator2. Head lamp leveling switch Head Lamp Leveling Switch Schematic diagrams Schematic Diagrams Repair procedures Replacement1.Disconnect the negative (-) battery terminal.
Hyundai Elantra (CN7) 2021-2026 Service Manual: Description and operating principle
Description and OperationWireless Power Charger SystemDuring ACC or IG ON, battery voltage is supplied to the wireless power charger system to transmit an output of 5 W to mobile phone. Mobile phones certified with the wireless charging standard WPC (Qi 1.
Categories
- Manuals Home
- Hyundai Elantra Owners Manual
- Hyundai Elantra Service Manual
- Auto Hold. Warning messages
- Drive Mode
- Suspension System
- New on site
- Most important about car
