Hyundai Elantra (CN7): Inside Rearview Mirror / Electrochromic mirror (ECM) with HomeLinkÂź system
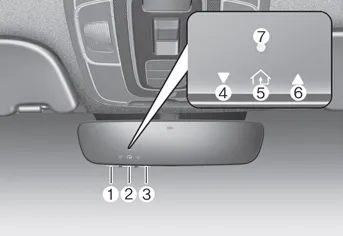
Your vehicle may be equipped with a Gentex Automatic-Dimming Mirror with an Integrated HomeLinkÂź Wireless Control System.
During nighttime driving, this feature will automatically detect and help reduce rearview mirror glare. The HomeLinkÂź Universal Transceiver allows you to activate your garage door(s), electric gate, home lighting, etc.
(1) HomeLink Channel 1
(2) HomeLink Channel 2
(3) HomeLink Channel 3
(4) Garage Door Opener Status Indicator :
Closing or Closed
(5) HomeLink Operation Indicator
(6) Garage Door Opener Status Indicator :
Opening or Opened
(7) HomeLink User Interface Indicator
Automatic-Dimming Night Vision Safetyâą (NVSÂź) Mirror (if equipped)
The NVSÂź Mirror automatically helps reduce glare by monitoring light levels in the front and the rear of the vehicle. Any object that obstructs either light sensor will degrade the automatic dimming control feature.
Your mirror will automatically dim upon detecting glare from the vehicles traveling behind you.
The mirror defaults to the ON position each time the vehicle is started.
Integrated HomeLinkÂź Wireless Control System
The HomeLinkÂź Wireless Control System can replace up to three hand-held radio-frequency (RF) transmitters with a single built-in device. This innovative feature will learn the radio frequency codes of most current transmitters to operate devices such as gate operators, garage door openers, entry door locks, security systems, even home lighting. Both standard and rolling code-equipped transmitters can be programmed by following the outlined procedures.
Additional HomeLinkÂź information can be found at: www.homelink.com, www. youtube.com/HomeLinkGentex or by calling 1-800-355-3515.
Retain the original transmitter of the RF device you are programming for use in other vehicles as well as for future HomeLinkÂź programming. It is also suggested that upon the sale of the vehicle, the programmed HomeLinkÂź buttons be erased for security purposes.
WARNING
Before programming HomeLinkÂź to a garage door opener or gate operator, make sure people and objects are out of the way of the device to prevent potential harm or damage. Do not use the HomeLinkÂź with any garage door opener that lacks the safety stop and reverse features required by U.S. federal safety standards (this includes any garage door opener model manufactured before April 1, 1982). A garage door that cannot detect an object - signaling the door to stop and reverse - does not meet current U.S. federal safety standards. Using a garage door opener without these features increases the risk of serious injury or death.
Programming HomeLinkÂź
Please note the following:
- When programming a garage door opener, it is advised to park the vehicle outside of the garage.
- It is recommended that a new battery be placed in the hand-held transmitter of the device being programmed to HomeLinkÂź for quicker training and accurate transmission of the radiofrequency signal.
- Some vehicles may require the Engine Start/Stop button to be in the ACC (or âAccessoriesâ) position for programming and/or operation of HomeLinkÂź.
- In the event that there are still programming difficulties or questions after following the programming steps listed below, contact HomeLinkÂź at: www.homelink.com, www.youtube. com/HomeLinkGentex or by calling 1-800-355-3515.
Programming
To program most devices, follow these instructions:
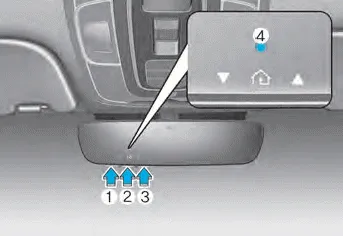
1. Press and release (1), (2) or (3) button.
- If the indicator (4) is turned ON in Orange, go to Step 3) since it is a new programming.
- If the indicator (4) is continuously turned ON or flashes in Green rapidly several times, go to Step 2) since it is a programmed button.
2. Press and hold the button you wish to program for approximately 15- 25 seconds until the LED flashes in Orange for several times.
3. Hold the Garage Door Opener Original Transmitter near the HomeLink Mirror.
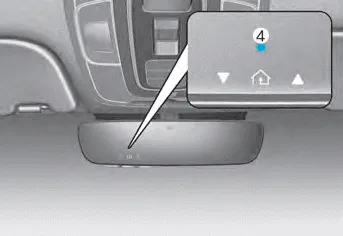
4. Press the Original Transmitter button until the indicator (4) is turned continuously ON or flashes in Green for approximately 10 seconds and it indicates the programing is completed.
5. However, the indicator (4) flashes in Green continuously, but if the garage door opener does not operate, please continue to follow the step 6 and 7 (âRolling Code Programmingâ procedures).
6. Firmly press and release the âLearn,â âSmart,â or âProgramâ button while the indicator (4) flashes in Green. Once the button is pressed, you have approximately 30 seconds to initiate the next step.
Information
At the garage door opener motor, (security gate motor, etc.) locate the âLearn,â âSmart,â or âProgramâ button. This can usually be found where the hanging antenna wire is attached to the motor-head unit (see the deviceâs manual to identify this button). The name and color of the button may vary by manufacturer. A ladder and/or second person may simplify the following steps.
7. Return to the vehicle and firmly press, hold for two seconds and release the HomeLink button up to three times. Do not press the HomeLink button rapidly. At this point programming is complete and your device should operate when the HomeLink button is pressed and released.
Information
- Some garage door openers require to press the programmed button on the mirror up to three times right after the programming is just completed to operate the garage door.
- The indicator (4) is turned ON in Orange and flashes for about 60 seconds, during the programing mode and if a programing is not succeeded within the 60 seconds, the programing mode will be abort.
HomeLinkÂź should now activate your rolling code equipped device.
Gate operator & Canadian programming
During programming, your handheld transmitter may automatically stop transmitting. Continue to press the Integrated HomeLinkÂź Wireless Control System button while you press and repress (âcycleâ) your handheld transmitter every two seconds until the frequency signal has been learned. The indicator light will flash slowly and then rapidly after several seconds upon successful training.
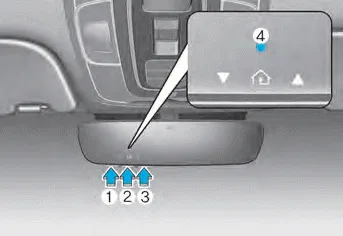
Operating HomeLink
1. Press and release one of the HomeLink buttons (1, 2 or 3) that programed.
2. The HomeLink indicator (4) will operate as below:
- Indicates Green and is continuously
ON (Fixed Code Garage Door
Opener)
- Flashes in Green rapidly (Rolling
Code Garage Door Opener)
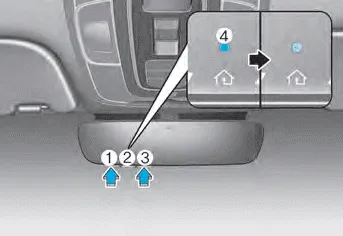
Erasing HomeLinkÂź buttons
1. Press and hold the button (1) and (3) simultaneously.
2. The indicator (4) is turned continuously ON in orange for about 10 seconds.
3. Then the indicator (4) color changes to Green and flashes rapidly. Release the buttons once the green indicator flashes.
4. Now HomeLink button (1), (2) and (4) memories are all cleared.
NVSÂź is a registered trademark and Z-Navâą is a trademark of the Gentex Corporation, Zeeland, Michigan. HomeLinkÂź is a registered trademark owned by Johnson Controls, Incorporated, Milwaukee, Wisconsin.
Information
This device complies with Part 15 of the FCC Rules.
Operation is subject to the following three conditions:
1. This device may not cause harmful interference, and
2. This device must accept any interference received, including interference that may cause undesired operation.
3. The transceiver has been tested and complies with FCC and Industry Canada rules. Changes or modifications not expressly approved by the party responsible for compliance could void the userâs authority to operate the device.
Two Way Communication Programing
1. Complete the HomeLink âProgrammingâ first.
2. Before the first 10 times HomeLink button is pressed after the programming, the following steps MUST occur to program two way communication. (only for some older garage doors)

3. Press and release the programed HomeLink button to activate the garage door.
4. Once the garage door is stopped, press and release the âLearnâ or âSmartâ button on the Garage door opener within 1 minute from the time of pressing the programed HomeLink button on mirror.
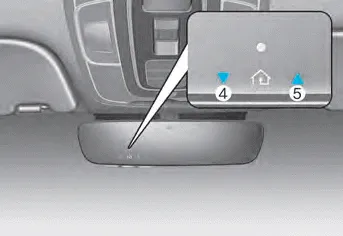
5. If the both indicator (4) and (5) are flashing rapidly for about 5 seconds, the two way synchronization is completed.
Information
Some newer garage door openers provide two-way communication synchronizing when programming the original transmitter.
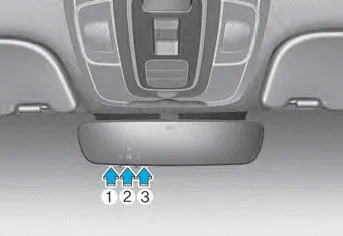
Operating Two Way Communication
1. Press and release (1), (2) or (3) button.
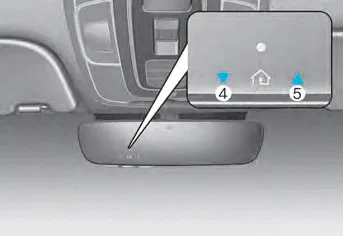
2. The indicator (4) and (5) operates as below:
- If the indicator (4) flashes in Orange,
it indicates that the garage door is
âclosingâ.
- If the indicator (4) is ON continuously
in Green, it indicates that the garage
door is âclosedâ.
- If the indicator (5) flashes in Orange,
it indicates that the garage door is
âOpeningâ.
- If the indicator (5) is ON
continuously in Green, it indicates
that the garage door is âOpenedâ.
- If the indicator (4) or (5) does not
turn to Green, it indicates that the
last status of garage door was not
received properly. The HomeLink
mirror tries to receive the last
known status of the garage door for
a few seconds.
Recalling Garage Door Status
Homelink mirror with two way communication provides a way to view the last stored message from the garage door opener. In order to recall the last known status of the last activated device, press the buttons â1 and 2â OR â2 and 3â simultaneously.
- If the indicator (4) is ON continuously in Green, it indicates that the last activated device was âclosedâ properly.
- If the indicator (5) is ON continuously in Green, it indicates that the last activated device was âopenâ properly.
Information
Two way communication range distance between âvehicleâ and âgarage door openerâ is 100m.
The range may be reduced or increased a little due to obstacle conditions around the garage door opener, such as houses or trees.
[A] : Lever, [B] : Day, [C] : Night Make this adjustment before you start driving and while the day/night lever is in the day position. Pull the day/night lever towards you to reduce glare from the headlamps of the vehicles behind you during night driving.
Make sure to adjust the side view mirrors to your desired position before you begin driving. Your vehicle is equipped with both left-hand and right-hand side view mirrors.
Other information:
Hyundai Elantra (CN7) 2021-2026 Service Manual: Description and operation
Description and operation The System may be limited when âą The radar sensor or camera is blocked with a foreign object or debris.âą The camera lens is contaminated due to tinted filmed or coated windshield, damaged glass, or stuck of foreign matter (sticker, bug, etc.
Hyundai Elantra (CN7) 2021-2026 Service Manual: Repair procedures
Inspection1.Check for resistance between terminals in each switch position (LH).[LH : Audio + Hands free] Switch Resistance (±5%) SEEK Up430 âŠSEEK Down1.11 kâŠMODE2.11 kâŠMUTE3.11 kâŠVolume (+)4.
Categories
- Manuals Home
- Hyundai Elantra Owners Manual
- Hyundai Elantra Service Manual
- General Tightening Torque Table. General information
- Engine Control / Fuel System
- Engine Mechanical System
- New on site
- Most important about car
