Hyundai Elantra (CN7): Seats / Seat Warmers
Front seat warmers
Seat warmers are provided to warm the seats during cold weather.
WARNING
The seat warmers can cause a SERIOUS BURN, even at low temperatures and especially if used for long periods of time.
Passengers must be able to feel if the seat is becoming too warm so they can turn it off, if needed.
People who cannot detect temperature change or pain to the skin should use extreme caution, especially the following types of passengers:
- Infants, children, elderly or disabled persons, or hospital outpatients.
- People with sensitive skin or who burn easily.
- Fatigued individuals.
- Intoxicated individuals.
- People taking medication that can cause drowsiness or sleepiness.
WARNING
NEVER place anything on the seat that insulates against heat when the seat warmer is in operation, such as a blanket or seat cushion. This may cause the seat warmer to overheat, causing a burn or damage to the seat.
NOTICE
To prevent damage to the seat warmers and seats:
- Never use a solvent such as paint thinner, benzene, alcohol or gasoline to clean the seats.
- Do not place heavy or sharp objects on seats equipped with seat warmers.
- Do not change the seat cover. It may damage the seat warmer or air ventilation system.

While the engine is running, push either of the switches to warm the driver’s seat or front passenger’s seat.
During mild weather or under conditions where the operation of the seat warmer is not needed, keep the switches in the OFF position.
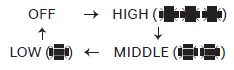
• Manual temperature control
Each time you push the switch, the temperature setting of the seat is changed as follows:
-- Front seat
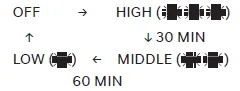
• Automatic temperature control
The seat warmer starts to automatically control the seat temperature in order to prevent low-temperature burns after being manually turned ON.
You may manually press the switch to increase seat temperature. However, it soon returns the automatic mode again.
- When pressing the switch for more than 1.5 seconds with the seat warmer operating, the seat warmer will turn OFF.
- The seat warmer defaults to the OFF position whenever the ignition switch is in the ON position. However, if the Auto Comfort Control function is ON, the driver’s seat warmer will turn on and off depending on the ambient temperature.
- Auto Comfort Control (for driver’s seat, if equipped)
The seat warmer automatically controls the seat temperature depending on the ambient temperature when the engine is running. If the seat warmer switch is pushed, the seat warmer will have to be controlled manually.To use this function, it must be activated from the Settings menu in the AVN system screen. For more details, refer to the separately supplied Car Infotainment System manual.
The vehicle’s front and rear seats have adjustable head restraints. The head restraints provide comfort for passengers, but more importantly they are designed to help protect passengers from whiplash and other neck and spinal injuries during an accident, especially in a rear impact collision.
This section describes how to use the seat belts properly. It also describes some of the things to avoid when using seat belts.
Other information:
Hyundai Elantra (CN7) 2021-2026 Service Manual: Compressor
Description and operation DescriptionThe compressor is the power unit of the A/C system.It is located on the side of engine block and driven by a V-belt of the engine.The compressor changes low pressure and low temperature refrigerant gas into high pressure and high temperature refrigerant gas.
Hyundai Elantra (CN7) 2021-2026 Service Manual: In-car Sensor
Description and operation DescriptionThe In-car air temperature sensor is built in the heater & A/C control unit.The sensor contains a thermistor which measures the temperature of the inside. The signal decided by the resistance value which changes in accordance with perceived inside temperature, is delivered to heater control unit and accor
Categories
- Manuals Home
- Hyundai Elantra Owners Manual
- Hyundai Elantra Service Manual
- Brake System
- Repair procedures
- Suspension System
- New on site
- Most important about car
