
Hyundai Elantra (CN7): Heater / Temperature Control Actuator
Description and operation
| Description |
Components and components location
| Components Location |
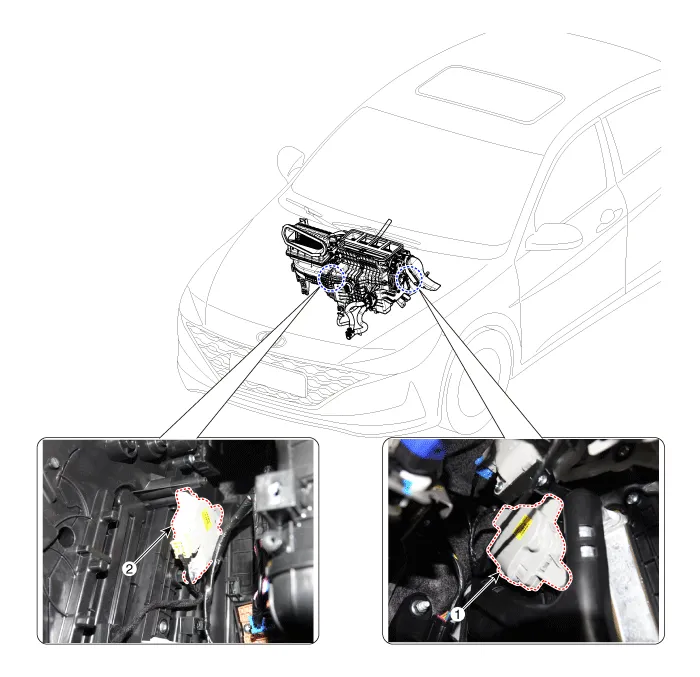
| 1. Temperature control actuator [LH] | 2.Temperature control actuator [RH] |
Specifications
| Specifications |
|
Door Position
|
Voltage (V)
|
Error Detecting
|
| Max. cooling | 0.3 ± 0.15 | Low voltage : 0.1V or less High voltage : 4.9V or more |
| Max. heating | 4.7 ± 0.15 |
Repair procedures
| Inspection |
| 1. | Turn the ignition switch OFF. |
| 2. | Disconnect the temperature control actuator connector. |
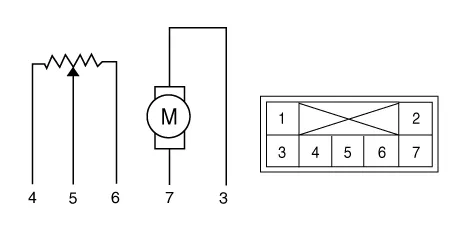
| 3. | Verify that the temperature control actuator operates to the cool position when connecting 12V to terminal 3 and grounding terminal 7. Verify that the temperature control actuator operates to the warm position when connected in reverse.
|
| 4. | Connect the temperature control actuator connector. |
| 5. | Turn the ignition switch ON. |
| 6. | Check the voltage between terminal 5 and 6. |
| 7. | If the measured voltage is not within specification, check the operation by replacing the existing temperature control actuator with a new genuine part. After that, determine whether replacement of the temperature control actuator is required or not. |
| Replacement |
| 1. | Disconnect the negative (-) battery terminal. |
| 2. | Remove the crash pad lower panel. (Refer to Body (Interior and Exterior) - "Crash Pad Lower Panel") |
| 3. | Loosen the mounting screw, remove the shower duct (A).
|

| 4. | Disconnect the connector (A) and then remove the driver's side temperature control actuator (B) after loosening the mounting screws.
|
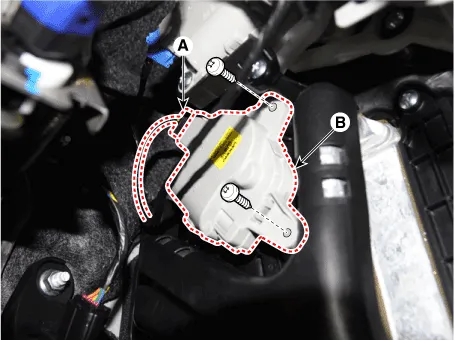
| 5. | To install, reverse the removal procedure. |
| 1. | Disconnect the negative (-) battery terminal. |
| 2. | Remove the glove box housing cover. (Refer to Body (Interior and Exterior) - "Glove Box Housing Cover") |
| 3. | Loosen the mounting screw, remove the shower duct (A).
|
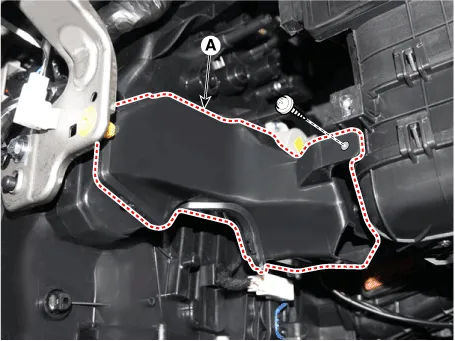
| 4. | Disconnect the connector (A) and then remove the passenger's side temperature control actuator (B) after loosening the mounting screws.
|
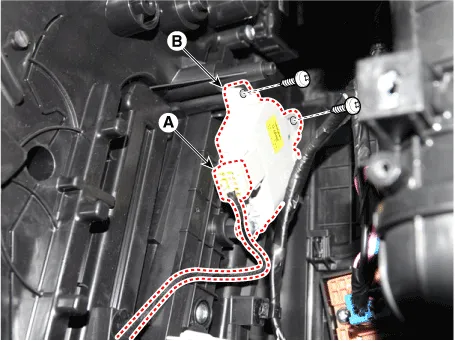
| 5. | To install, reverse the removal procedure. |
Repair procedures Replacement1.Disconnect the negative (-) battery terminal. 2.Remove the heater and blower assembly.(Refer to Heater - "Heater Unit") 3.
Description and operation DescriptionThe mode control actuator is located at the heater unit.It adjusts the position of the mode door by operating the mode control actuator based on the signal of the A/C control unit.
Other information:
Hyundai Elantra (CN7) 2021-2026 Service Manual: Turn Signal Lamp
Repair procedures Removal1.Disconnect the negative (-) battery terminal.2.Remove the front bumper.(Refer to Body - "Front Bumper Cover")3.Remove the head lamp.4.Remove the bulb socket (A) and turn signal lamp bulb (B) from the lamp assembly.Replacement1.
Hyundai Elantra (CN7) 2021-2026 Service Manual: Heater Control Unit
Components and components location Component Location1. Heater control unitComponents[Connector A] Pin No Function Pin No Function 1Mode control actuator (Feedback)21Mode control actuator (Vent)2Intake actuator (Feedback)22Mode control actu
Categories
- Manuals Home
- Hyundai Elantra Owners Manual
- Hyundai Elantra Service Manual
- Instrument Panel Overview
- Auto Hold. Warning messages
- Brake bleeding procedures
- New on site
- Most important about car
