Hyundai Elantra (CN7): Air Conditioning System / A/C Pressure Transducer
Description and operation
The A/C Pressure Transducer (APT) converts the pressure value of high pressure line into voltage value after measuring it. By converted voltage value, engine ECU controls the cooling fan by operating it high speed or low speed. Engine ECU stops the operation of the compressor when the temperature of refrigerant line is very high or very low irregularly to optimize air conditioning system.
Repair procedures
| •
| Before measuring the pressure of the refriferant line, check whether the refrigerant amount is charged in accordance with the specified charging amount. (Refer to Heating, Ventilation, Air Conditioning - "Specifications") |
|
| 1. | Turn the ignition switch OFF. |
| 2. | Install the refrigerant recovery/recycling/charging system. (Refer to Air Conditioning System - "Repair procedures") |
| 3. | Turn ON the ignition switch, put into operation the air conditioner. |
| 4. | Calculate the reference voltage of the Recovery/Recycle/Recharge machine high pressure value using the formula below. Reference voltage (V) = 0.0088 * pressure(psi) + 0.37 |
|
| 5. | Measure the sensor output voltage between terminal "1" and "2". 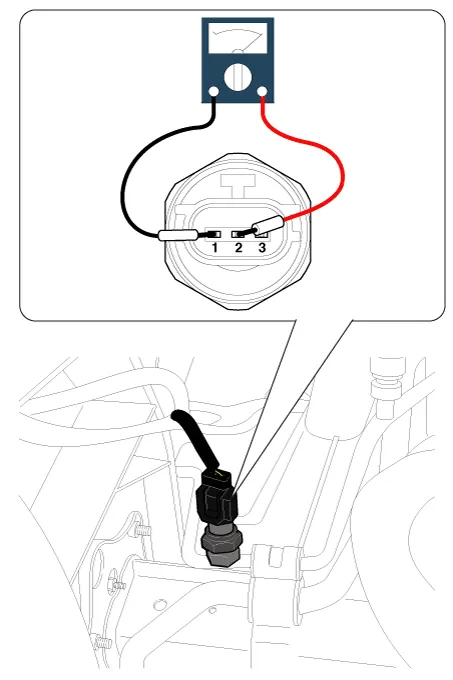
Pin No
| Function
| 1
| Ground
| 2
| Voltage
| 3
| Power (+5V)
|
|
| 6. | If the reference voltage value and the sensor output voltage value are close to each other, the air conditioner pressure transducer is normal. |
| 7. | If 0V is output or the reference voltage value and sensor output voltage value are not close to each other, replace the air conditioner pressure transducer. | •
| Check if the output voltage changes when the high pressure value of the refrigerant line changes. 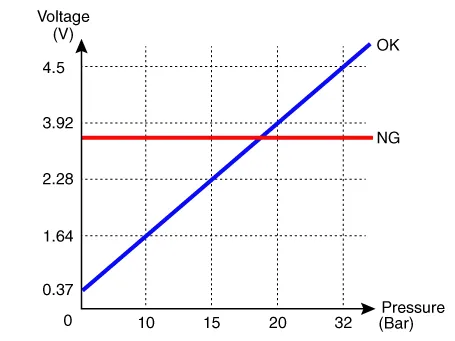
|
|
|
| 1. | Disconnect the negative (-) battery terminal. |
| 2. | Recover the refrigerant with a recovery/charging station. |
| 3. | Disconnect the A/C pressure transducer connector (A). 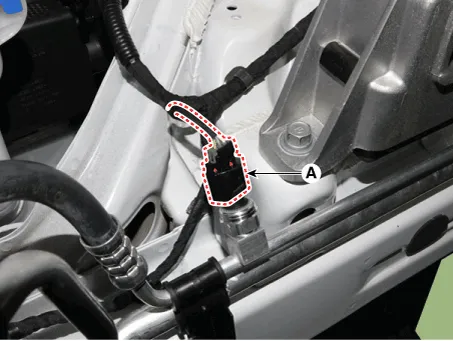
|
| 4. | Remove the A/C pressure transducer (A). Tightening torque : 9.8 - 11.8 N.m (1.0 - 1.2 kgf.m, 7.2 - 8.7 lb-ft) |

| •
| Be careful not to bend the liquid & suction pipe. |
|
|
| 5. | To install, reverse the removal procedure. | •
| When installing, replace it with a new O-ring. |
|
|
Repair procedures
Replacement1.Remove the condenser.2.Remove the cap (A) on the bottom of the condenser with a L wrench. Tightening torque : 9.
Description and operation
DescriptionThe evaporator temperature sensor will detect the evaporator core temperature and interrupt compressor relay power in order to prevent evaporator from freezing by excessive cooling.
Other information:
SpecificationAir Conditioner
Item
Specification
CompressorTypeGamma 1.6 MPI, Gasoline 2.0 NU MPI, Gasoline 1.6 T-GDI : 6HVx14Gasoline 1.6 MPI : 6HVe14Oil type & CapacityFD46XG (IDEMITSU) 100 ± 10 g Pulley type6PK-TYPEDisplacement145 cc/revExpansion valveTypeBlock type RefrigerantTypeR - 134
Repair procedures
Inspection1.Connect the battery voltage and check the blower motor rotation.Replacement1.Disconnect the negative (-) battery terminal.2.Disconnect the blower motor connector (A) and then remove the blower motor (B) after loosening the screws.


