
Hyundai Elantra (CN7): Body (Interior and Exterior) / Floor Carpet. Repair procedures
Repair procedures
| Replacement |
|

|

| 1. | Remove the front seat assembly. (Refer to Front Seat - "Front Seat Assembly") |
| 2. | Remove the rear seat cushion assembly. (Refer to Rear Seat - "Rear Seat Assembly") |
| 3. | Remove the floor console assembly. (Refer to Floor Console - "Floor Console Assembly") |
| 4. | Remove the center pillar lower trim. (Refer to Interior Trim - "Center Pillar Trim") |
| 5. | Remove the cowl side trim. (Refer to Interior Trim - "Cowl Side Trim") |
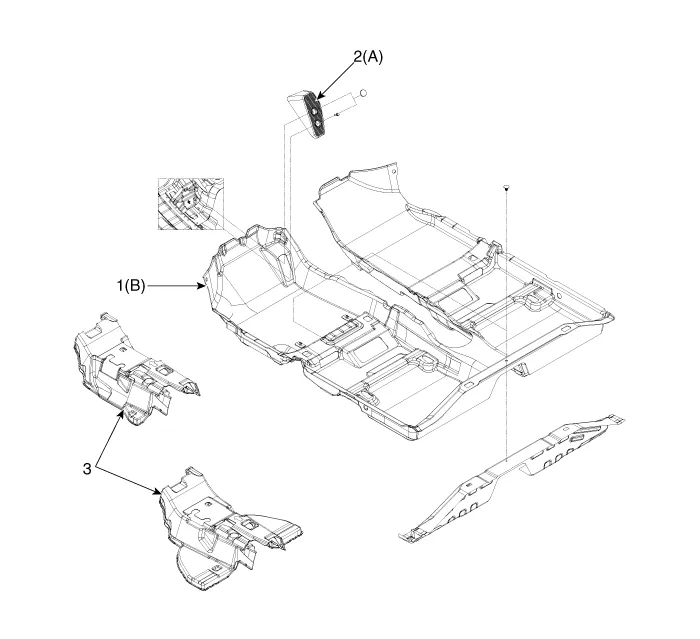
| 6. | Remove the footrest (A). |
| 7. | Remove the floor carpet assembly (B). |
| 8. | To install, reverse the removal procedure.
|

Removal • Put on gloves to prevent hand injuries. • Use seat covers to avoid damaging any surfaces.
Components and components location Components[General type]1. Front bumper assembly2. Front bumper side bracket [LH]3. Front bumper side bracket [RH][N Line]1.
Other information:
Hyundai Elantra (CN7) 2021-2026 Service Manual: Mode Control Actuator
Description and operation DescriptionThe mode control actuator is located at the heater unit.It adjusts the position of the mode door by operating the mode control actuator based on the signal of the A/C control unit. Pressing the mode select switch makes the mode control actuator shift in order of Vent → Bi-Level → Floor → Mix.
Hyundai Elantra (CN7) 2021-2026 Service Manual: Troubleshooting
Diagnosis with Diagnostic tool1.In the body electrical system, failure can be quickly diagnosed by using the vehicle diagnostic system (Diagnostic tool).The diagnostic system (Diagnostic tool) provides the following information.(1)Fault Code Searching : Checking failure and code number (DTC)(2)Data Analysis : Checking the system input/output data s
Categories
- Manuals Home
- Hyundai Elantra Owners Manual
- Hyundai Elantra Service Manual
- Front Radar Unit
- Body Electrical System
- General Tightening Torque Table. General information
- New on site
- Most important about car
