Hyundai Elantra: AVN System / External AMP
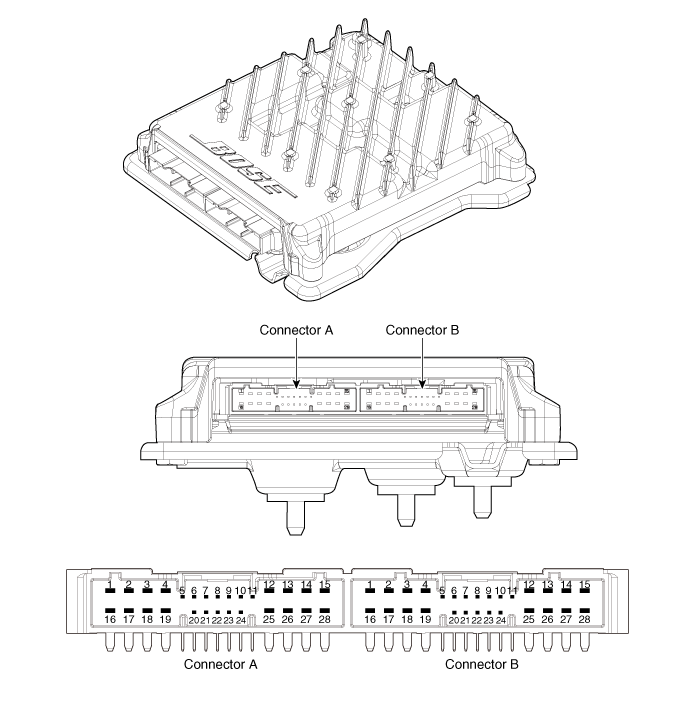
Components and components location
| Components |
|
NO
|
Connector A
|
NO
|
Connector B
|
| 1 | BATT (+) | 1 | Subwoofer 2 (+) |
| 2 | BATT (+) | 2 | Subwoofer 1 (+) |
| 3 | BATT (+) | 3 | Sub woofer speaker (+) |
| 4 | BATT (+) | 4 | - |
| 5 | - | 5 | - |
| 6 | Multimedia CAN (High) | 6 | - |
| 7 | Multimedia CAN (Low) | 7 | Navigation voice (+) |
| 8 | ACC | 8 | - |
| 9 | - | 9 | - |
| 10 | - | 10 | - |
| 11 | - | 11 | - |
| 12 | - | 12 | Rear door speaker - RH (+) |
| 13 | - | 13 | Rear door speaker - LH (+) |
| 14 | - | 14 | Center speaker (+) |
| 15 | - | 15 | - |
| 16 | Ground | 16 | Front door tweeter speaker - RH (-) |
| 17 | Ground | 17 | Front door tweeter speaker - LH (-) |
| 18 | Ground | 18 | Sub woofer speaker (-) |
| 19 | Ground | 19 | - |
| 20 | SPDIF (High) | 20 | - |
| 21 | SPDIF (Low) | 21 | Navigation voice (+) |
| 22 | SPDIF GND | 22 | - |
| 23 | - | 23 | - |
| 24 | IGN 1 | 24 | - |
| 25 | - | 25 | Rear door speaker - RH (-) |
| 26 | - | 26 | Rear door speaker - LH (-) |
| 27 | - | 27 | Center speaker (+) |
| 28 | - | 28 | - |
Repair procedures
| Removal |
| 1. | Disconnect the negative (-) battery terminal. |
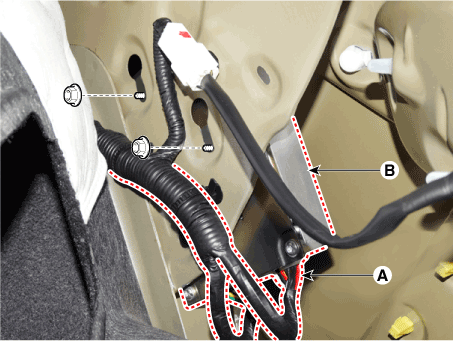
| 2. | Open the trunk, remove the right luggage side trim. (Refer to Body - "Luggage Side Trim") |
| 3. | Remove the external amplifier (B) after disconneting the connector (A) and loosening the mounting nuts.
|
| Installation |
| 1. | Install the external amplifier after connecting the connector. |
| 2. | Install the right luggage side trim. |
| 3. | Connect the negative (-) battery terminal.
|


 AVN Remote Controller
Components and components location
Components1. Left Remote Control Switch (Audio + Bluetooth)2. Right Remote Control Switch (Cruise + Trip)
Schematic diagrams
Circuit Diagram[Without paddle shift][With paddle shift][Audio + B/Tooth][Audio + B/Tooth + Voice][Trip][Trip / Cruise][Trip + Cruise + LFA)[Trip + Cruise + LFA + MSLA)[Trip + Smart Cruise + LFA)[Trip + Smart Cruise + LFA + MSLA..
Other information:
Hyundai Elantra (CN7) 2021-2025 Owner's Manual: Special Driving Conditions
Hazardous Driving Conditions When hazardous driving elements are encountered such as water, snow, ice, mud and sand, take the below suggestions: Drive cautiously and keep a longer braking distance. Avoid abrupt braking or steering. When your vehicle is stuck in snow, mud, or sand, use second gear. Accelerate slowly to avoid unnecessary wheel spin. Put sand, rock salt, tire chains o..
Hyundai Elantra (CN7) 2021-2025 Owner's Manual: SRS Care
The SRS is virtually maintenance-free and there are no parts you can safely service by yourself. If the SRS air bag warning light does not illuminate when the ignition switch is in the ON position, or continuously remains on, have your vehicle immediately inspected by an authorized HYUNDAI dealer. Any work on the SRS system, such as removing, installing, repairing, or any work on the stee..
Categories
- Manuals Home
- 7th Gen Hyundai Elantra Owners Manual
- 7nd Gen Hyundai Elantra Service Manual
- Dimensions, Engine specification, Bulb Wattage
- Instrument Panel Overview
- Integrated Thermal Management Module (ITM)
- Recommended Lubricants and Capacities
- Engine Mechanical System
Tachometer
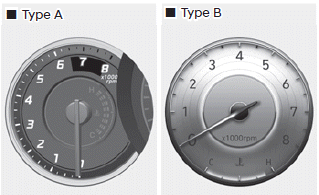
The tachometer indicates the approximate number of engine revolutions per minute (RPM).
Use the tachometer to select the correct shift points and to prevent lugging and/ or over-revving the engine.
NOTICE
Do not operate the engine within the tachometer's RED ZONE. This may cause severe engine damage.

Copyright © 2025 www.helantra7.com