Hyundai Elantra: Power Windows / Power Window Motor
Hyundai Elantra (CN7) 2021-2025 Service Manual / Body Electrical System / Power Windows / Power Window Motor
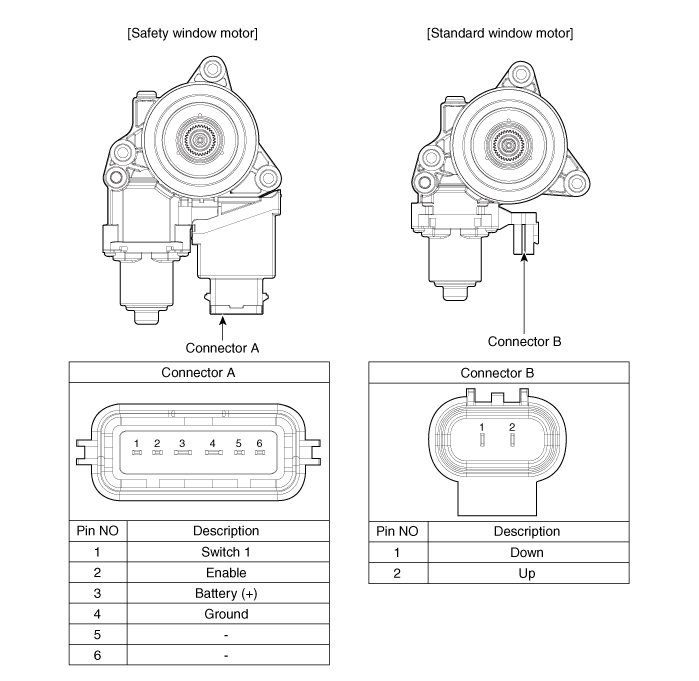
Components and components location
| Components |
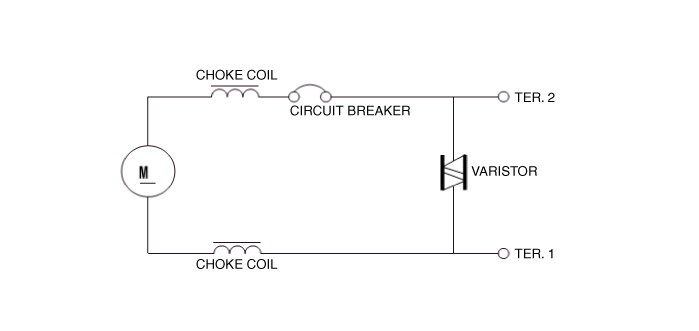
Schematic diagrams
| Circuit Diagram |
Standard type
Repair procedures
| Inspection |
|

Front Power Window Motor
| 1. | Disconnect the negative (-) battery terminal. |
| 2. | Remove the front door trim. (Refer to Body - "Front Door Trim") |
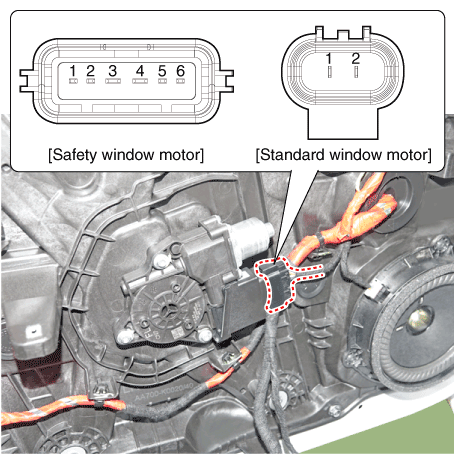
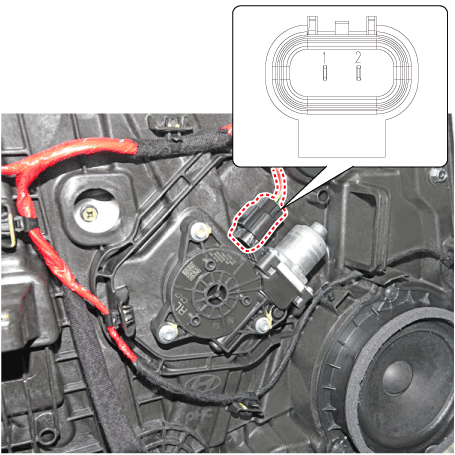
| 3. | Disconnect the motor connector from the motor.
|
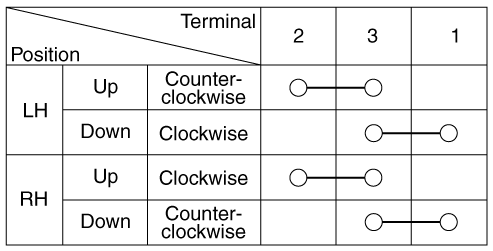
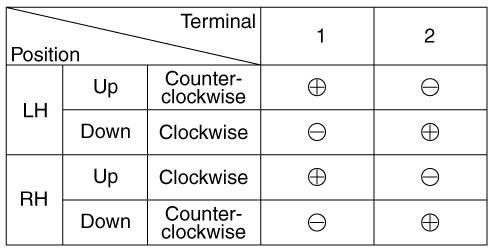
| 4. | Connect the terminal No.1 and No.2 to battery voltage (12V) and check that the motor operates smoothly when connecting the terminals below. [Safety Window Motor]
|
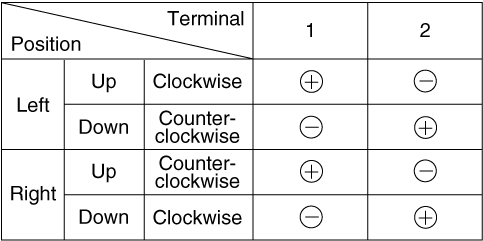
| 5. | Connect the motor terminals directly to battery voltage (12V) and check that the motor operates smoothly. Next, reverse the polarity and check that the motor operates smoothly in the reverse direction. If the operation is abnormal, replace the motor. [Standard Window Motor]
|
Rear Power Window Motor
| 1. | Disconnect the negative (-) battery terminal. |
| 2. | Remove the rear door trim. (Refer to Body - "Rear Door Trim") |
| 3. | Disconnect the motor connector from the motor.
|
| 4. | Connect the motor terminals No.1 and No.2 directly to battery voltage (12V) and check that the motor operates smoothly. If the operation is abnormal, replace the motor. [Safety Window Motor]
|

 Power Window Switch
Components and components location
ComponentsDriver Power Window SwitchSub Power Window Switch (Passenger)Sub Power Window Switch (Rear)
Schematic diagrams
Circuit DiagramMain power window switch[Auto down + Door lock][Driver side safety + Door lock]Sub Power Window Switch (Passenger)Sub Power Window Switch (Rear)[Non auto][Non auto + Seat heater]
Repair procedures
RemovalDriv..
Other information:
Hyundai Elantra (CN7) 2021-2025 Service Manual: Troubleshooting
Troubleshooting Trouble symptom Probable cause Remedy Displayed the warning lamp "E"(Driving is only possible with 1/ R gear)Not performed DCT learningPerform the DCT manual learning procedure.Impossible to driving with odd gearClutch actuator (Clutch motor 1 or position sensor 1 failure)Replace the clutch actuator ass..
Hyundai Elantra (CN7) 2021-2025 Service Manual: Rear Seat Folding Lever
Components and components location Components1.Rear seat folding lever Repair procedures Replacement1.Fold the rear seat back assembly (A) by pulling the folding lever in the direction of the arrow.2.Loosen the mounting clips and bolts, remove the rear seat folding lever (A).3.To install, reverse the removal procedure...
Categories
- Manuals Home
- 7th Gen Hyundai Elantra Owners Manual
- 7nd Gen Hyundai Elantra Service Manual
- Dimensions, Engine specification, Bulb Wattage
- Engine Oil
- Body Electrical System
- Drive Mode
- Control Cable
Manual climate control system
To defog inside windshield
.png)
[A] : Type A, [B] : Type B
1. Select any fan speed except “0” position.
2. Select the desired temperature.
3. Select the .png) or
or
.png) position.
position.

Copyright © 2025 www.helantra7.com