Hyundai Elantra: Cylinder Block / Cylinder Block
Hyundai Elantra (CN7) 2021-2025 Service Manual / Engine Mechanical System / Cylinder Block / Cylinder Block
Repair procedures
| Disassembly |
|

|

| 1. | Remove the crankshaft. (Refer to Cylinder Block - "Crankshaft") |
| 2. | Remove the water jacket insert. (Refer to Cylinder Block - "Water Jacket Insert") |
| 3. | Remove the knock sensor. (Refer to Engine Control / Fuel System - "Knock Sensor (KS)") |
| 4. | Remove the crankshaft position sensor (CKPS). (Refer to Engine Control / Fuel System - "Crankshaft Position Sensor (CKPS)") |
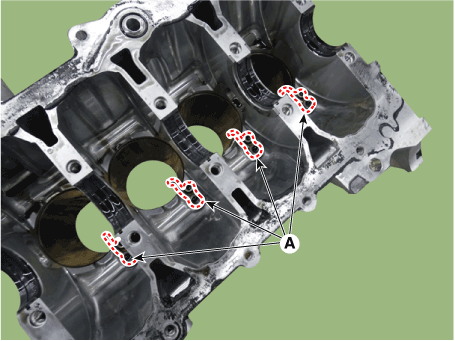
| 5. | Remove the piston cooling oil jets (A).
|
| Inspection |
| 1. | Using a gasket scraper, remove all the gasket material from the top surface of the cylinder block. |
| 2. | Using a soft brush and solvent, thoroughly clean the cylinder block. |
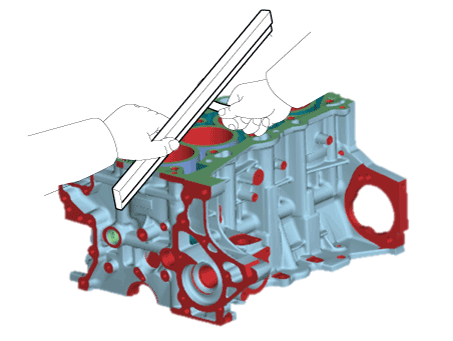
| 3. | Inspect the top surface of cylinder block for flatness. Using a precision straight edge and feeler gauge, measure the surface contacting the cylinder head gasket for warpage.
|
| 4. | Visually check for scratches on the inside surface of the cylinder bore and replace the cylinder block if any noticeable scratch is detected. If deep scratchs are present, replace the cylinder block. |
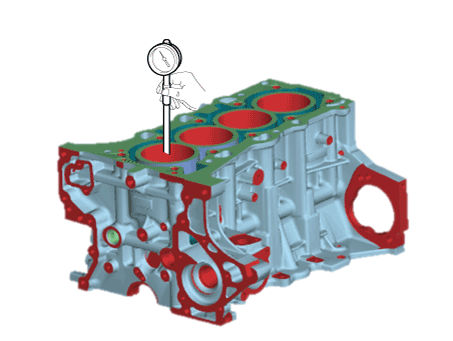
| 5. | Using the cylinder bore gauge, measure the cylinder bore’s inner diameter to the axial and axial perpendicular directions.
|
| Reassembly |
|
| 1. | Install the piston cooling oil jets (A).
|
| 2. | Install the crankshaft. (Refer to Cylinder Block - "Crankshaft") |
| 3. | Check the crankshaft end play. (Refer to Cylinder Block - "Crankshaft") |
| 4. | Disconnect the lower crankcase and check crankshaft bearing oil clearance. (Refer to Cylinder Block - "Crankshaft") |
| 5. | Install the piston and connecting rod assembly. (Refer to Cylinder Block - "Piston and Connecting Rod") |
| 6. | Check the connecting rod bearing cap oil clearance. (Refer to Cylinder Block - "Piston and Connecting Rod") |
| 7. | Check the connecting rod end play. (Refer to Cylinder Block - "Piston and Connecting Rod") |
| 8. | Assemble the other parts in the reverse order of disassembly.
|
 Crankshaft
Repair procedures
Disassembly
•
Use fender covers to avoid damaging painted surfaces.•
To avoid damage, unplug the wiring connectors carefully while holding the connector portion...

Other information:
Hyundai Elantra (CN7) 2021-2025 Owner's Manual: Emergency braking
If there is a problem with the brake pedal while driving, emergency braking is possible by pulling up and holding the EPB switch. Braking is possible only while you are holding the EPB switch. However, braking distance will be longer than normal. WARNING Do not operate the parking brake while the vehicle is moving except in an emergency situation. It could damage the brake system and lead..
Hyundai Elantra (CN7) 2021-2025 Service Manual: Starter
Description and operation DescriptionThe starting system includes the battery, starter, solenoid switch, ignition switch, inhibitor switch, ignition lock switch, connection wires and the battery cable.When the ignition key is turned to the start position, current flows and energizes the starter motor's solenoid coil.The solenoid plunger and clutch shift lever are activated, and the clutch pinio..
Categories
- Manuals Home
- 7th Gen Hyundai Elantra Owners Manual
- 7nd Gen Hyundai Elantra Service Manual
- Specifications
- System operation
- Engine Mechanical System
- Control Cable
- System disabled
Tire Rotation
To equalize tread wear, HYUNDAI recommends that the tires be rotated according to the maintenance schedule or sooner if irregular wear develops.
During rotation, check the tires for correct balance.
When rotating tires, check for uneven wear and damage. Abnormal wear is usually caused by incorrect tire pressure, improper wheel alignment, out-ofbalance wheels, severe braking or severe cornering. Look for bumps or bulges in the tread or side of the tire. Replace the tire if you find any of these conditions. Replace the tire if fabric or cord is visible. After rotation, be sure to bring the front and rear tire pressures to specification and check lug nut tightness (proper torque is 79~94 lbf·ft [11~13 kgf·m]).

Copyright © 2025 www.helantra7.com