Hyundai Elantra: Cylinder Block / Crankshaft
Repair procedures
| •
| Use fender covers to avoid damaging painted surfaces. |
| •
| To avoid damage, unplug the wiring connectors carefully while holding the connector portion. |
|
| •
| Mark all wiring connector and hoses to avoid misconnection. |
| •
| To release the fuel system pressure before removing the engine assembly, start the engine without fuel pump relay. Then, switch "OFF" the ignition when engine stops. |
| •
| Turn the crankshaft pulley so that the No. 1 piston is at top dead center. |
|
| 1. | Remove the piston and connecting rod assembly. (Refer to Cylinder Block - "Piston and Connecting Rod") |
| 2. | Remove the air conditioning compressor. (Refer to Heating, Ventilation and Air Conditioning - "Compressor") |
| 3. | Remove the rear caps (A). 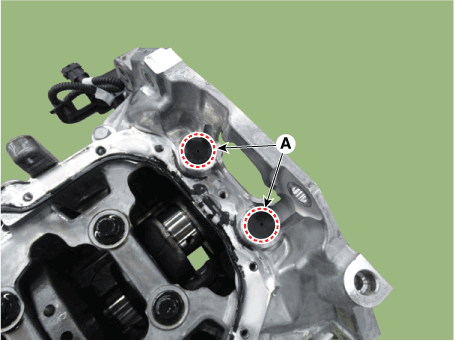
|
| 4. | Remove the lower crankcase. | (1) | Remove the lower crankcase mounting bolts (A). 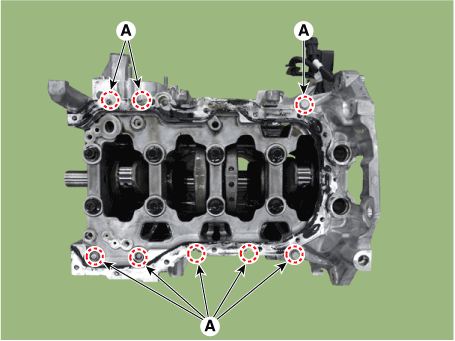
|
| (2) | Remove the crankshaft bearing cap bolts (B). 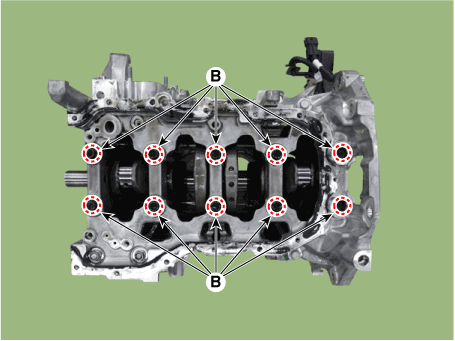
|
| (3) | Remove the lower crankcase (A). 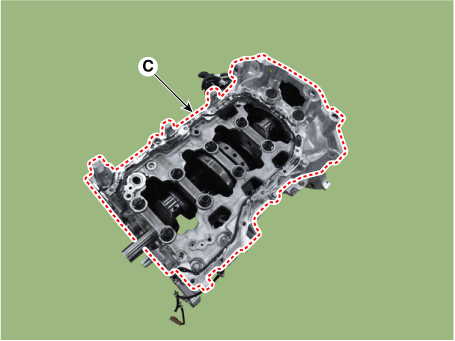
|
|
| 5. | Remove the crankshaft position sensor wheel (A). 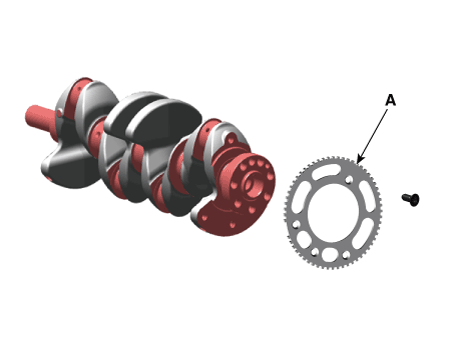
|
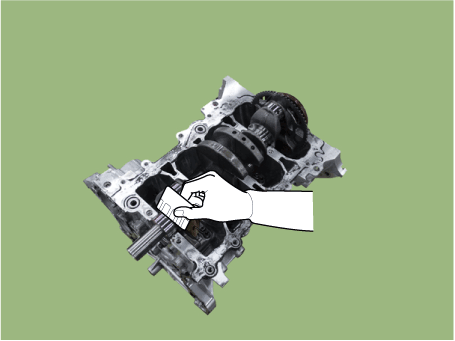
| 6. | Lift the crankshaft (A) out of the engine block, being careful not to damage journals. 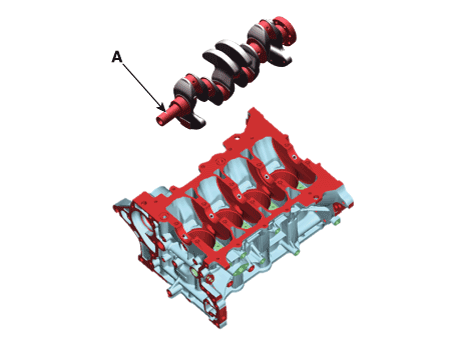
|
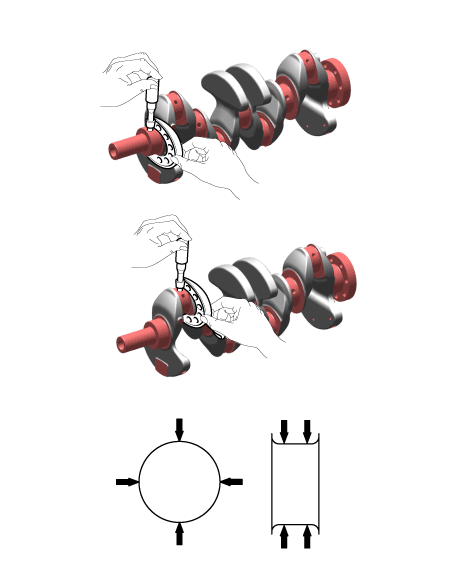
| 1. | Check the crankshaft bearing oil clearance. | (1) | Clean each main journal and lower bearing with a clean shop towel. |
| (2) | Place one strip of plastcigauge across each main journal. |
| (3) | Reinstall the bearing caps with their lower bearings, then tighten the bolts. Tightening torque : Crank lower case mounting bolts : 18.6 - 23.5 N.m (1.9 - 2.4 kgf.m, 13.7 - 17.4 lb-ft) Bearing cap mounting bolts : 27.5 - 31.4 N.m (2.8 - 3.2 kgf.m, 20.3 - 23.1 lb-ft) + 118 - 122° |
[Crank lower case mounting bolts] 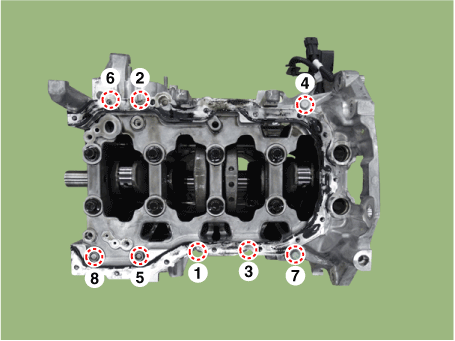
[Bearing cap mounting bolts] 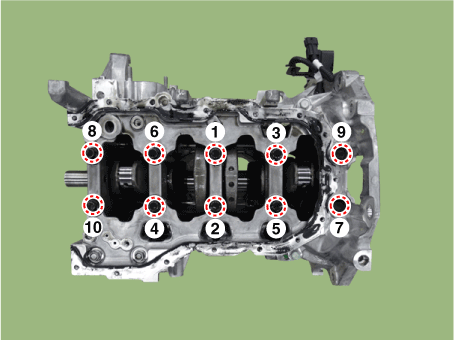
| •
| Do not turn the crankshaft. |
|
|
| (4) | Remove the lower crankcase, and measure the widest part of the plasticgauge. Bearing oil clearance : 0.030 - 0.048 mm (0.0012 - 0.0019 in.) |
|
| (5) | If the plasticgauge measures too wide or too narrow, remove the upper and lower bearing and then install a new bearings with the same color mark (select the color as shown in the next column). Recheck the oil clearance. | •
| Do not file, shim, of scrape the bearings or the caps to adjust clearance. |
|
|
| (6) | If the plasticgauge shows that the clearance is still incorrect, try the next larger or smaller bearing (the color listed above or below that one), and check clearance again. | •
| If the plasticgauge shows that the clearance is still incorrect, try the next larger or smaller bearing (the color listed above or below that one), and check clearance again. |
| •
| If the marks are indecipherable because of an accumulation of dirt and dust, do not scrub them with a wire brush or scraper. Clean them only with solvent or detergent. |
|
Cylinder Block Crankshaft Journal Bore Mark Location Letters have been stamped on the side surface of the block as a mark for the size of each of the 5 main journal bores. Use them, and the numbers or letters stamped on the crank (marks for main journal size), to choose the correct bearings. 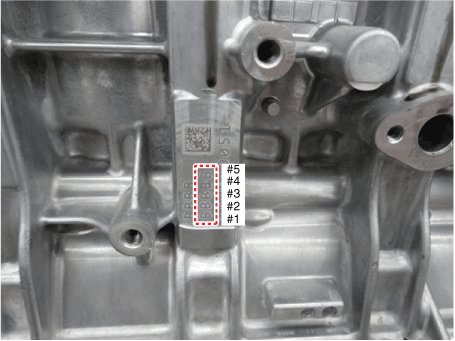
Class
| Mark
| Cylinder block crankshaft journal bore inner diameter
| a
| A
| 50.000 - 50.006 mm
(1.9685 - 1.9687 in.)
| b
| B
| 50.006 - 50.012 mm
(1.9687 - 1.9690 in.)
| c
| C
| 50.012 - 50.018 mm
(1.9690 - 1.9692 in.)
|
Crankshaft Main Journal Mark Location 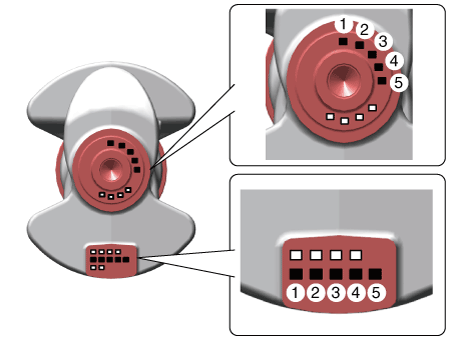
Discrimination Of Crankshaft Main Journal
Class
| Mark
| Crankshaft main journal outer diameter
| Ⅰ
| 1
| 44.954 - 44.960 mm
(1.7698 - 1.7701 in.)
| II
| 2
| 44.948 - 44.954 mm
(1.7696 - 1.7698 in.)
| III
| 3
| 44.942 - 44.948 mm
(1.7694 - 1.7696 in.)
|
Crankshaft Bearing Identification Mark Location [No. 2, No. 4 Journal Upper Bearing] 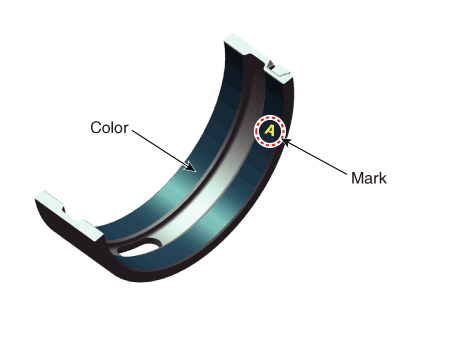
[No. 1, No. 3, No. 5 Journal Upper Bearing] 
[Lower Bearing] 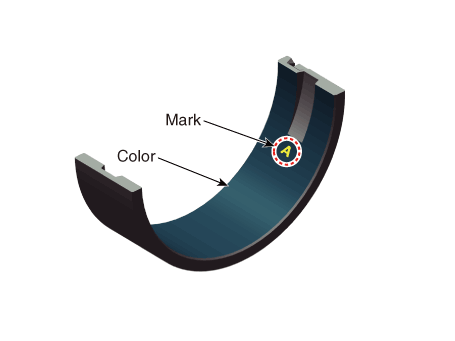
Discrimination Of Crankshaft Bearing
Class
| Color
| Bearing thickness
| A
| Blue
| 2.524 - 2.527 mm
(0.0994 - 0.0995 in.)
| B
| Black
| 2.521 - 2.024 mm
(0.0993 - 0.0797 in.)
| C
| None
| 2.518 - 2.521 mm
(0.0991 - 0.0993in.)
| D
| Green
| 2.515 - 2.518 mm
(0.0990 - 0.0991 in.)
| E
| Red
| 2.512 - 2.515 mm
(0.0989 - 0.0990 in.)
|
|
| (7) | Select the bearing by using selection table. Crankshaft Main Bearing Selection Table
| Main journal bore Identification Mark
| a (A)
| b (B)
| c (C)
| Crank shaft main journal mark
| I (1)
| E (Red)
| D (Green)
| C (None)
| II (2)
| D (Green)
| C (None)
| B (Black)
| III (3)
| C (None)
| B (Black)
| A (Blue)
|
|
|
| 2. | Check the crankshaft end play. Using a dial indicator, measure the thrust clearance while prying the crankshaft back and forth with a screwdriver. Crankshaft end play 0.100 - 0.280 mm (0.0039 - 0.0110 in.) |
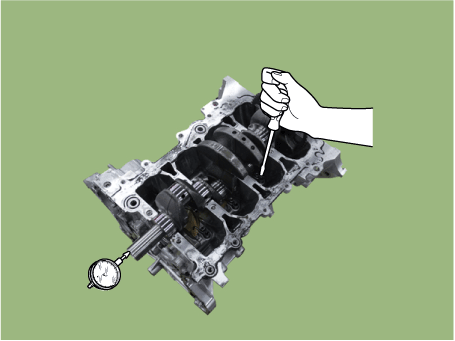
If the end play is greater than maximum, replace the thrust bearings as a set. Thickness of thrust bearing : 2.910 - 2.950 mm (0.1146 - 0.1161 in.) |
|
| 3. | Inspect the crankshaft main journals and pin journals. Using a micrometer, measure the diameter of each main journal and pin journal. Main journal diameter : 44.942 - 44.960 mm (1.7694 - 1.7701 in.) Crank pin diameter : 41.954 - 41.972 mm (1.6517 - 1.6524 in.) |
|
| •
| Thoroughly clean all parts to assembled. |
| •
| Before installing the parts, apply fresh engine oil to all sliding and rotating surfaces. |
| •
| Always use new gaskets, O-ring and oil seals. |
|
| 1. | Install the crankshaft position sensor wheel (A). Tightening torque : 12.7 - 13.7 N.m (1.3 - 1.4 kgf.m, 9.4 - 10.1 lb-ft) |
|
| 2. | Install the main bearing. | •
| When installing the crankshaft upper bearings, the upper bearings should fit for each journal. [No. 2, No. 4 Journal Upper Bearing] 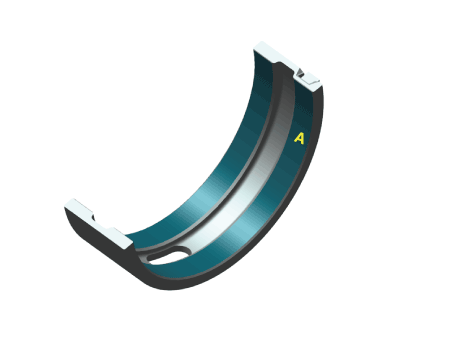
[No. 1, No. 3, No. 5 Journal Upper Bearing] 
|
|
| (1) | Align the bearing claw with the groove of the cylinder block, and push in the 5 upper bearings (A). 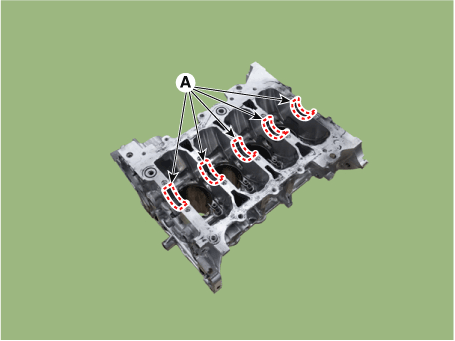
|
| (2) | Align the bearing claw with the groove of the crank lower case, and push in the 5 lower bearings (A). 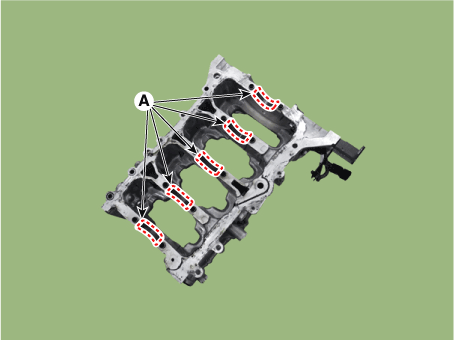
|
| (3) | Apply a coat of engine oil after assembling the main bearings. |
|
| 3. | Install the thrust bearings. Install the 2 thrust bearings (A) on both sides of the No.4 journal of the cylinder block with the oil groove facing out. 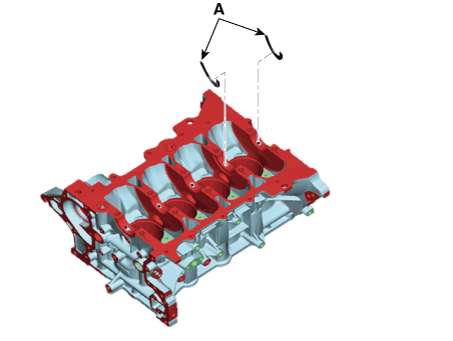
|
| 4. | Place the crankshaft (A) on the cylinder block. 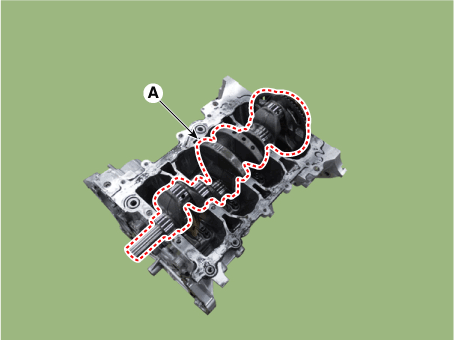
| •
| When exchanging the crankshaft and short engine, apply if the pilot bearing is not assembled. [DCT Only] |
| •
| When press fitting the pilot bearing, press fit so that the load is applied only to the outer race of the pilot bearing. - if load is applied to the seal and inner race, the component or bearing inside may be damaged. 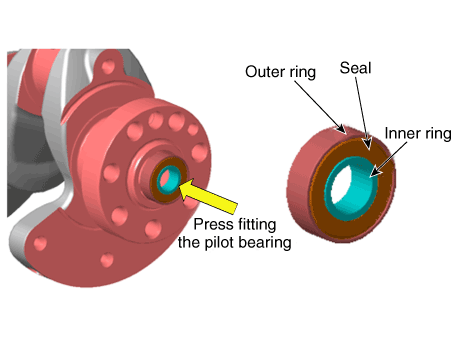
|
| •
| Press-fit depth of the pilot bearing (A) : 1.5 - 2.0 mm (0.0591 - 0.0787 in) from the end of the crankshaft. 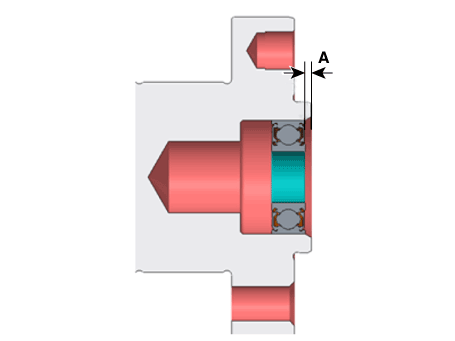
|
|
|
| 5. | Install the lower crankcase. | (1) | Make sure to remove hardened sealant, foreign matters, oil, dust, moisture on the sealing face of the liquid gasket of the lower crankcase. Spray the cleaner on the sealing surface and wipe it off with a clean cloth. |
| (2) | Install the new O-ring (A) on the cylinder block. 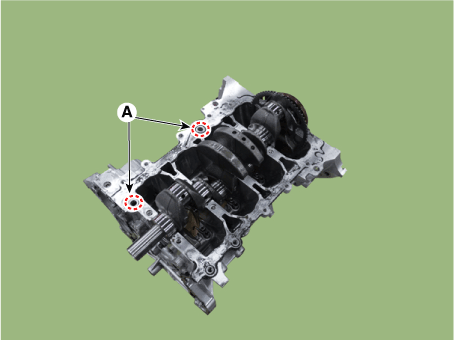
|
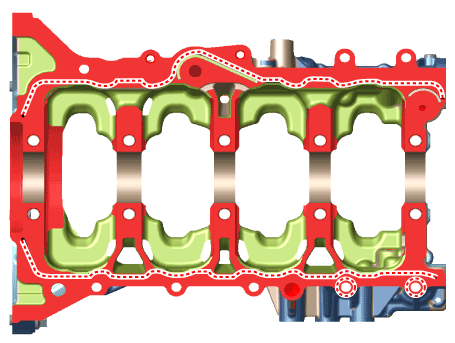
| (3) | Apply liquid sealant on lower crankcase. Then, assemble the part within 5 minutes of applying sealant. Width : 2.5 - 3.5 mm (0.0984 - 0.1378 in) Specification : MS721-40AA or AAO / above. |
|
| (4) | Tighten the crankshaft bearing cap bolts several times according to the tightening sequence shown below. Tightening torque : 27.5 - 31.4 N.m (2.8 - 3.2 kgf.m, 20.3 - 23.1 lb-ft) + 118 - 122° |
| •
| Always use new bearing cap bolts. |
|
|
| (5) | Tighten the lower crankcase mounting bolts several times according to the tightening sequence shown below. Tightening torque : 18.6 - 23.5 N.m (1.9 - 2.4 kgf.m, 13.7 - 17.4 lb-ft) |
|
| (6) | Install the rear caps (A).
| •
| When installing the rear cap, make sure that the cylinder block installed surface and the rear cap installed surface are aligned. 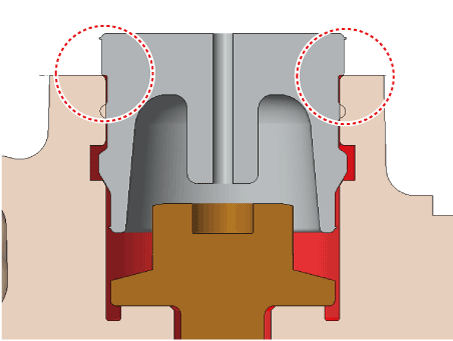
|
|
| (1) | Check that the crankshaft turns smoothly. |
|
|
| 6. | Check the crankshaft end play. |
| 7. | Install the piston and connecting rod assemblies. (Refer to Cylinder Block - "Piston and Connecting Rod") |
| 8. | Assemble the other parts in the reverse order of disassembly. | •
| In case the crankshaft is replaced with a new one, select the proper connecting rod bearing according to the pin journal mark on the crankshaft. |
| •
| Connecting rod bearing selection (Refer to Cylinder Block - "Piston and Connecting Rod") |
|
|
Repair procedures
Disassembly
•
Use fender covers to avoid damaging painted surfaces.•
To avoid damage, unplug the wiring connectors carefully while holding the connector portion...
Repair procedures
Disassembly
•
Use fender covers to avoid damaging painted surfaces.•
To avoid damage, unplug the wiring connectors carefully while holding the connector portion...
Other information:
Specifications
Item
Specification
Ultrasonic sensorVoltage ratingDC 12 VDetecting range11.8 - 47.2 in. (30 - 120 cm)Operation voltageDC 9 - 16 VOperation currentMAX 350 mAOperation temperature-22 - 176°F (-30 - 80°C)Operation frequency48 ± 5 KHzNumber of sensors8 units..
SpecificationIgnition System
Ignition Coil
Item
Specification
Primary Coil Resistance (Ω)0.75 ± 15% [20°C (68°F)]Secondary Coil Resistance (kΩ)5.9 ± 15% [20°C (68°F)]
Spark Plug
Item
Specification
TypeSILZKR8J8GSGap0.7 - 0.8 mm(0.0275 - 0.0314 in.)Charging ..


 Piston and Connecting Rod
 Cylinder Block
.png)
