Hyundai Elantra: Cylinder Block / Piston and Connecting Rod
Repair procedures
| •
| Use fender covers to avoid damaging painted surfaces. |
| •
| To avoid damage, unplug the wiring connectors carefully while holding the connector portion. |
|
| •
| Mark all wiring connector and hoses to avoid misconnection. |
| •
| To release the fuel system pressure before removing the engine assembly, start the engine without fuel pump relay. Then, switch "OFF" the ignition when engine stops. |
|
| 1. | Remove the engine and transaxle assembly. (Refer to Engine and Transaxle Assembly - "Engine and Transaxle Assembly") |
| 2. | Remove the rear oil seal. (Refer to Cylinder Block - "Rear Oil Seal") |
| 3. | Install the engine assembly to engine stand for disassembly. |
| 4. | Remove the cylinder head. (Refer to Cylinder Head Assembly - "Cylinder Head") | •
| Turn the crankshaft pulley so that the No. 1 piston is at top dead center. |
|
|
| 5. | Remove the oil filter body. (Refer to Lubrication System - "Oil Filter & Oil Cooler") |
| 6. | Remove the oil pump. (Refer to Lubrication System - "Oil Pump") |
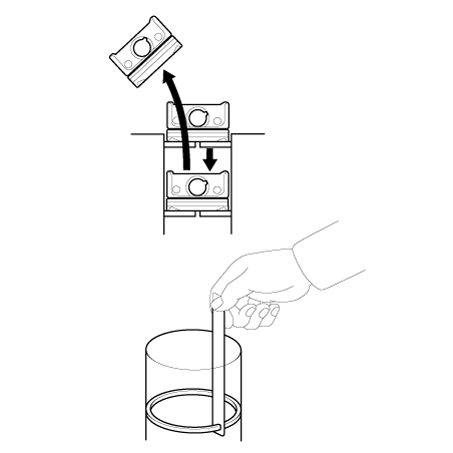
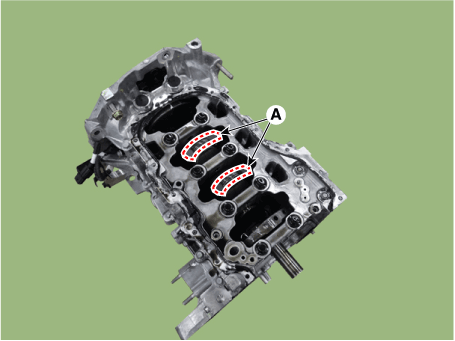
| 7. | Remove the piston and connecting rod assembly. | (1) | Using a ridge reamer, remove all the carbon from the top of the cylinder. |
| (2) | Remove the connecting rod bearing caps (A). 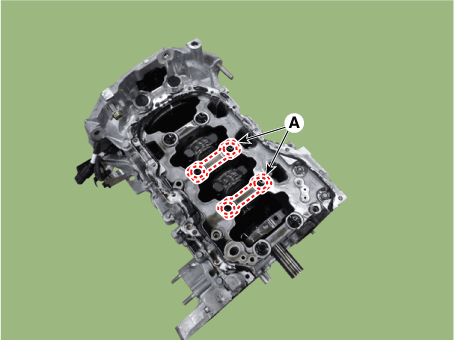
| •
| Mark the connecting rod, and caps to be able to reassemble in the original position and direction. |
|
|
| (3) | Push the piston and connecting rod assembly (A) with upper bearing through the top of the cylinder block. 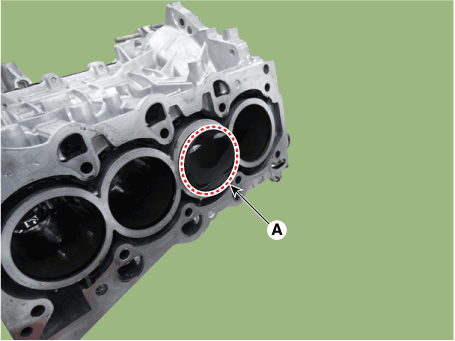
| •
| Keep the connecting rod ands cap with their bearings assembled together. |
| •
| Arrange the piston and connecting rod assemblies in the correct order. |
|
|
|
| 8. | Check fit between piston and piston pin. Try to move the piston back and forth on the piston pin. If any movement is felt, replace the piston and piston pin as a set. |
| 9. | Disassemble the piston rings. | (1) | Using a piston ring expender, remove the 2 piston rings (A). |
| (2) | Remove the oil ring (B) by hand. |
|
| 10. | Disassemble the connecting rod from the piston. | (1) | Remove the snap ring (C) from the piston. |
| (2) | Using a press, remove the piston pin (D) from the piston. |
| (3) | Disassemble the piston (E) and connecting rod (F). 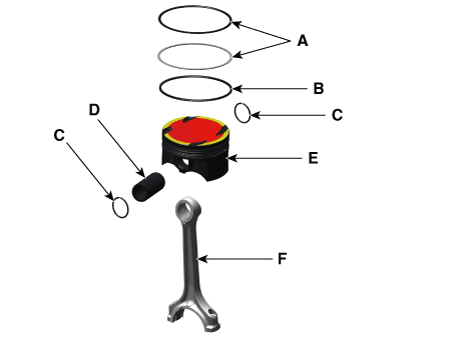
|
|
Connecting Rod
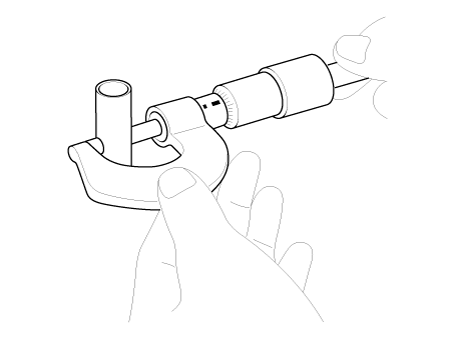
| 1. | Check the side clearance between piston and connecting rod. Using feeler gauge, measure the side clearance while moving the connecting rod back and forth. Side clearance Standard : 0.1 - 0.25 mm (0.0039 - 0.0098 in.) Maximum : 0.35 mm (0.0138 in.) |

| •
| If out-of-tolerance, install a new connecting rod. |
| •
| If still out-of-tolerance after connecting rod replacement, replace the crankshaft. |
|
| 2. | Check the connecting rod bearing oil clearance. | (1) | Check the match marks on the connecting rod and cap are aligned to ensure correct reassembly. |
| (2) | Remove the 2 connecting rod cap bolts. |
| (3) | Remove the connecting rod cap and lower bearing. |
| (4) | Clean the crankshaft pin journal and bearing. |
| (5) | Place a plasticgauge across the crankshaft pin journal. |
| (6) | Reinstall the lower bearing and connecting rod cap, and torque the bolts. Tightening torque : 17.7 - 21.6 N.m (1.8 - 2.2 kgf.m, 13.0 - 15.9 lb-ft) + 68° - 72° |
| •
| Do not turn the crankshaft. |
|
|
| (7) | Remove the connecting rod cap. |
| (8) | Measure the plasticgauge at its widest point. Bearing oil clearance : 0.037 - 0.055 mm (0.0015 - 0.0022 in.) |
|
| (9) | If the measurement from the plasticgauge is too wide or too narrow, remove the upper and lower bearing and then install a new bearings with the same color mark. Recheck the oil clearance. | •
| Do not file, shim, of scrape the bearings or the caps to adjust clearance. |
|
|
| (10) | If the plasticgauge shows the clearance is still incorrect, try the next larger or smaller bearing. Recheck the oil clearance. | •
| If the proper clearance cannot be obtained by using the appropriate larger or smaller bearings, replace the crankshaft and start over. |
| •
| If the marks are indecipherable because of an accumulation of dirt and dust, do not scrub them with a wire brush or scraper. Clean them only with solvent or detergent. |
|
Connecting Rod Identification Mark 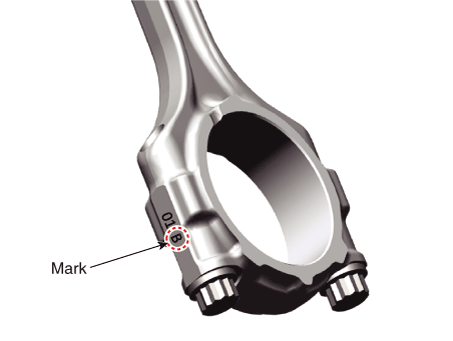
Identification Of Connecting Rod
Class
| Mark
| Connecting rod big-end inner diameter
| A
| 0
| 45.000 - 45.006 mm
(1.7717 - 1.7719 in.)
| B
| 1
| 45.006 - 45.012 mm
(1.7719 - 1.7721 in.)
| C
| 2
| 45.012 - 45.018 mm
(1.7721 - 1.7724 in.)
|
Crankshaft Pin Outside Diameter Identification Mark 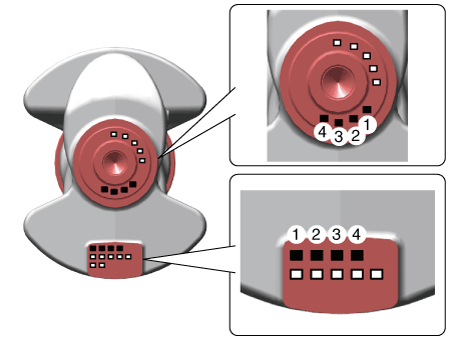
Identification Of Crankshaft Pin Outside Diameter
Class
| Mark
| Crankshaft pin journal outer diameter
| Ⅰ
| 1
| 41.972 - 41.966 mm
(1.6524 - 1.6522 in.)
| II
| 2
| 41.966 - 41.960 mm
(1.6522 - 1.6520 in.)
| III
| 3
| 41.960 - 41.954 mm
(1.6520 - 1.6517 in.)
|
Connecting Rod Bearing Identification Mark 
Discrimination of Connecting Rod Bearing
Class
| Color
| Connecting rod bearing thickness
| A
| Blue
| 1.510 - 1.513 mm
(0.0594 - 0.0596 in.)
| B
| Black
| 1.507 - 1.510 mm
(0.0593 - 0.0594 in.)
| C
| None
| 1.504 - 1.507 mm
(0.0592 - 0.0593 in.)
| D
| Green
| 1.501 - 1.504 mm
(0.0591 - 0.0592 in.)
| E
| Red
| 1.498 - 1.501 mm
(0.0590 - 0.0591 in.)
|
|
| (11) | Use the bearing selection table below to select a suitable connecting rod bearing. Connecting Rod Bearing Selection Table
| Connecting Rod Identification Mark
| A
| B
| C
| Crankshaft Pin Journal Indentification Mark
| 1
| E (Red)
| D (Green)
| C (None)
| 2
| D (Green)
| C (None)
| B (Black)
| 3
| C (None)
| B (Black)
| A (Blue)
|
|
|
| 3. | Check the connecting rods. | (1) | When reinstalling, make sure that cylinder numbers put on the connecting rod and cap at disassembly match. When a new connecting rod is installed, make sure that the notches for holding the bearing in place are on the same side. |
| (2) | Replace the connecting rod if it is damaged on the thrust faces at either end. Also if step wear or a severely rough surface of the inside diameter of the small end is apparent, the rod must be replaced as well. |
| (3) | Using a connecting rod aligning tool, check the rod for bend and twist. If the measured value is close to the repair limit, correct the rod by a press. Any connecting rod that has been severely bent or distorted should be replaced. Allowable bend of connecting rod : 0.05 mm (0.0020 in.) / 100 mm (3.94 in.) Allowable twist of connecting rod : 0.1 mm (0.0039 in.) / 100 mm (3.94 in.) |
| •
| When the connecting rods installed without bearings, there should be no difference on side surface. |
|
|
|
Piston
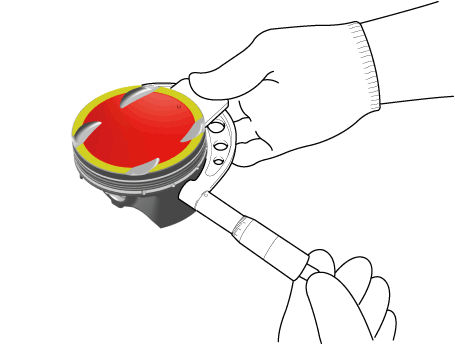
| 1. | Clean the piston. | (1) | Using a gasket scraper, remove the carbon from the piston top. |
| (2) | Using a groove cleaning tool or broken ring, clean the piston ring grooves. |
| (3) | Using solvent and a brush, thoroughly clean the piston. | •
| Do not use a wire brush. |
|
|
|
| 2. | Check the piston-to-cylinder clearance by calculating the difference between the cylinder bore inner diameter and the piston outer diameter. Piston-to-cylinder clearance : 0.035 - 0.055 mm (0.0014 - 0.0022 in.) |
| (1) | Using a cylinder bore gauge, measure the cylinder bore diameter at position in the thrust and axial direction. Cylinder bore diameter : 75.60 - 75.63 mm (2.9764 - 2.9776 in.) |
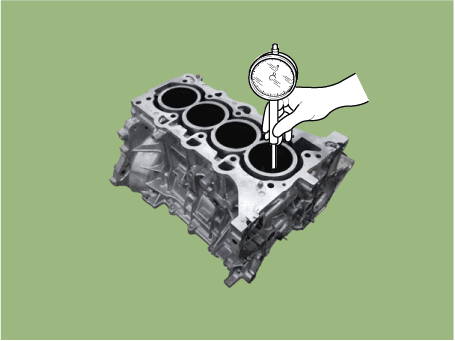
|
| (2) | Measure the piston outside diameter at 13.0 mm (0.5118 in.) from bottom land of the piston. Piston outside diameter : 75.555 - 75.585mm (2.9746 - 2.9758 in.) |
|
|
| 3. | Select the piston matching with cylinder bore class. (match classification mark) Piston-to-cylinder clearance : 0.035 - 0.055 mm (0.0014 - 0.0022 in.) |
| (1) | Check the cylinder bore size mark on the side of the cylinder block. 
Discrimination of Cylinder Bore Size
Class
| Mark
| Cylinder bore inner diameter
| a
| A
| 75.60 - 75.61 mm
(2.9764 - 2.9768 in.)
| b
| B
| 75.61 - 75.62 mm
(2.9768 - 2.9772 in.)
| c
| C
| 75.62 - 75.63 mm
(2.9772 - 2.9776 in.)
|
|
| (2) | Check the piston outer diameter size mark (A) on the piston top face. 
A : GRADE MARK (A,B, C) T : T-GDI 5 : 1.6L P : Specification Discrimination of Piston Outer Diameter
Mark
| Piston outer diameter
| A
| 75.555 - 75.565 mm
(2.9746 - 2.9750 in.)
| B
| 75.565 - 75.575 mm
(2.9750 - 2.9754 in.)
| C
| 75.575 - 75.585 mm
(2.9754 - 2.9758 in.)
|
|
|
Piston Rings
| 1. | Inspect the piston ring side clearance. Using a feeler gauge, measure the clearance between new piston ring and the wall of ring groove. Piston ring groove width dimension of piston No.1 ring : 1.230 - 1.250 mm (0.0484 - 0.0492 in.) No.2 ring : 1.030 - 1.050 mm (0.0406 - 0.0413 in.) Oil ring : 2.030 - 2.045 mm (0.0799 - 2.0805 in.) Piston ring width dimension No.1 ring : 1.170 - 1.190 mm (0.0461 - 0.0469 in.) No.2 ring : 0.970 - 0.990 mm (0.0382 - 0.0390 in.) Oil ring : 1.920 - 1.960 mm (0.0756 - 0.0772 in.) Piston and piston ring side clearance No.1 ring : 0.040 - 0.080 mm (0.0016 - 0.0031 in.) No.2 ring : 0.040 - 0.080 mm (0.0016 - 0.0031 in.) Oil ring : 0.050 - 0.105 mm (0.0020 - 0.0041 in.) |
If the clearance is greater than maximum, replace the piston. |
| 2. | Inspect the piston ring end gap. To measure the piston ring end gap, insert a piston ring into the cylinder bore. Position the ring at right angles to the cylinder wall by gently pressing it down with a piston. Measure the gap with a feeler gauge. If the gap exceeds the specifications, replace the piston rings. If the gap is too large, recheck the cylinder bore inner diameter. Piston ring end gap [Standard] No.1 ring : 0.14 - 0.19 mm (0.0055 - 0.0075 in.) No.2 ring : 0.20 - 0.30 mm (0.0079 - 0.0118 in.) Oil ring : 0.10 - 0.40 mm (0.0039 - 0.0157 in.) |
|
Piston Pin
| 1. | Measure the outer diameter of piston pin Piston pin diameter : 18.997 - 19.000 mm (0.7479 - 0.7480 in.) |
|
| 2. | Measure the piston pin-to-piston clearance. Piston pin-to-piston clearance : 0.004 - 0.012 mm (0.0002 - 0.0005 in.) |
|
| 3. | Check the difference between the piston pin outer diameter and the connecting rod small end inner diameter. Piston pin-to-connecting rod interference : 0.005 - 0.014 mm (0.0002 - 0.0006 in.) |
|
| •
| Thoroughly clean all parts to assembled. |
| •
| Before installing the parts, apply fresh engine oil to all sliding and rotating surfaces. |
| •
| Always use new gaskets, O-ring and oil seals. |
|
| 1. | Assemble the piston and the connecting rod. | (1) | Install the snap ring (A) in one side of the piston pin hole. 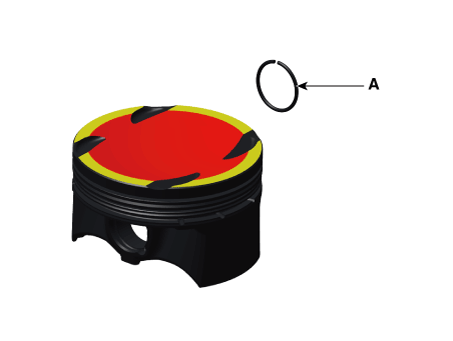
|
| (2) | Align the piston front mark (A) and the connecting rod front mark (B). 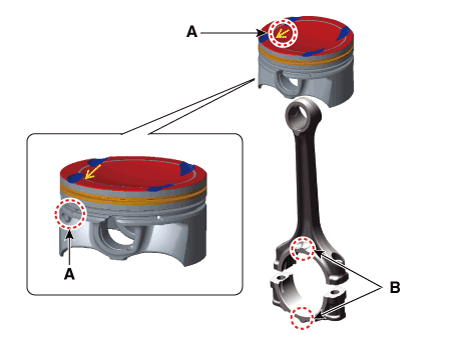
|
| (3) | Insert the piston pin (A) into the piston pin hole and the small end bore of connecting rod. |
| (4) | Install the snap ring (B) in the other side after inserting the piston pin. 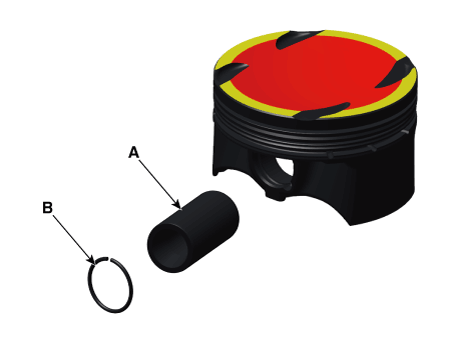
| •
| Before inserting the piston pin, apply sufficient engine oil on the piston’s outer surface, piston hole’s inner surface and connecting rod’s small-end bore. |
| •
| When inserting, use caution not to damage or scratch the connecting rods’ small-end hole, piston’s pin hole and piston pin. |
| •
| Install the snap ring surely so that the snap ring contacts the overall groove of the piston’s pin hole. |
| •
| Assemble so that the cut surface of the snap ring is located within the upper 45° range. 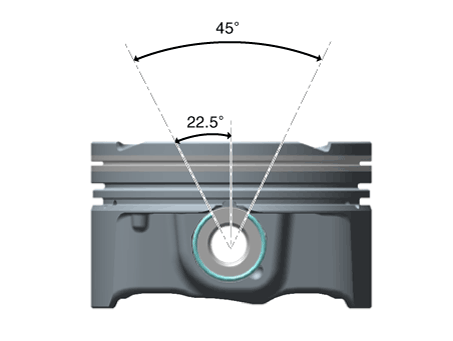
|
|
|
|
| 2. | Install the piston rings. | (1) | Install the oil ring expander and two side rails by hand. |
| (2) | Using a piston ring expander, install the 2 compression rings with the maker mark facing upward. |
| (3) | Position the piston rings so that the ring ends are as shown. 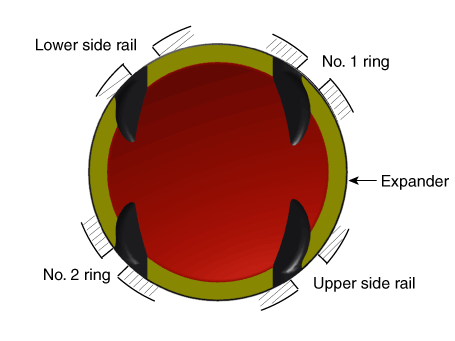
| •
| The side rail is an asymmetric barrel type and install it so that DMC mark faces upward (Cylinder head side). At this time, paint identification mark should be positioned at the right side of ring cutting section. |
|
|
|
| 3. | Install the connecting rod bearings. | (1) | Align the bearing (B) claw with the groove of the connecting rod or bearing cap (A). |
| (2) | Install the bearings (B) in the connecting rod and bearing cap (A). 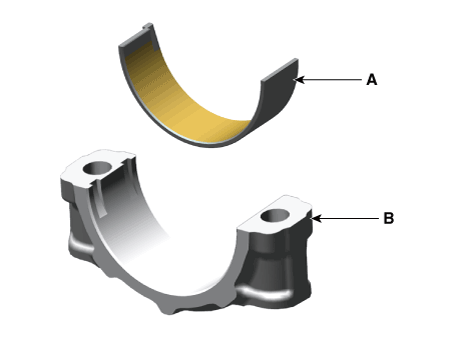
|
|
| 4. | Install the piston and connecting rod assembly. | •
| Before installing the piston, apply a coat of engine oil to the piston ring grooves and cylinder bores. |
| •
| The piston front mark (A) and the connecting rod front mark (B) must face the timing chain side of the engine.
|
|
| (1) | Install the ring compressor, check that the rings are securely in place, then position the piston in the cylinder, and tap it in using the wooden handle of a hammer. |
| (2) | Stop after the ring compressor pops free, and check the connecting rod-to-crank journal alignment before pushing the piston into place. 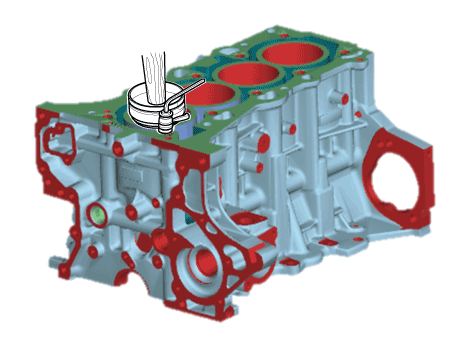
| •
| Maintain downward force on the ring compressor to prevent the rings from expanding before entering the cylinder bore. |
|
|
| (3) | Install the connecting rod caps (A) with bearings, and tighten the bolts. Tightening torque : 17.7 - 21.6 N.m (1.8 - 2.2 kgf.m, 13.0 - 15.9 lb-ft) + 68 - 72° |
| •
| Always use new connecting rod cap bolts. |
|
|
|
| 5. | Assemble the other parts in the reverse order of disassembly. |
Components and components location
Components1. Rear oil seal
Repair procedures
Replacement1.Remove the drive plate.(Refer to Cylinder Block - "Drive Plate")2...
Repair procedures
Disassembly
•
Use fender covers to avoid damaging painted surfaces.•
To avoid damage, unplug the wiring connectors carefully while holding the connector portion...
Other information:
DescriptionThe Seat Belt Pretensioners (BPT) are installed inside center pillar (LH & RH). When a vehicle crashes with a certain degree of frontal impact, the pretensioner seat belt helps to reduce the severity of injury to the front seat occupants by retracting the seat belt webbing...
Components Location1. Remote control switch (LH : Audio swtich)2. Remote control switch (RH : Cruse)3. Front rader unit..


 Rear Oil Seal
 Crankshaft
.png)
