Hyundai Elantra (CN7): Seat Electrical / Lumber Support Units
Repair procedures
| Removal |
| 1. | Disconnect the negative (-) battery terminal. |
| 2. | Remove the front seat assembly. (Refer to Body - "Front Seat Assembly") |
| 3. | Remove the seat back. (Refer to Body - "Front Seat Back Cover") |
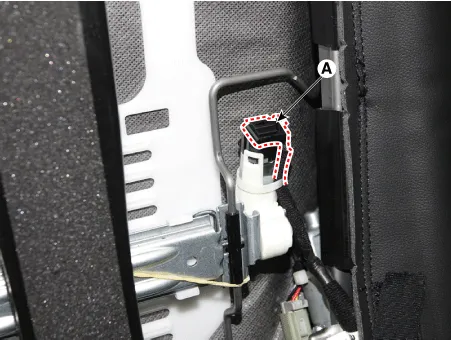
| 4. | Disconnect the lumber support motor connector (A).
|
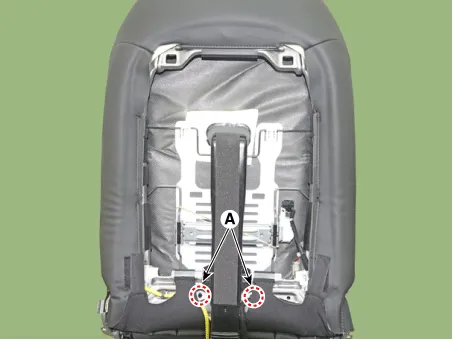
| 5. | Separate the retaining clips (A) from the seat frame.
|
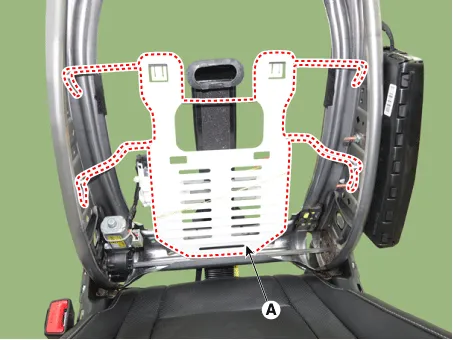
| 6. | Remove the lumber support assembly (A) after disengaging mounting clip.
|
| Installation |
| 1. | Install the lumbar support assembly. |
| 2. | Install the seat back cover. |
| 3. | Install the front seat assembly.
|

| Inspection |
| 1. | Disconnect the connectors for each motor. [Lumbar Support Motor]
|

| 2. | With the battery connected directly to the motor terminals, check if the motors run smoothly. |
| 3. | Reverse the connections and check that the motor turns in reverse. |
| 4. | If there is an abnormality, replace the motors.
|

Components and components location Component Location[Front Ventilation Seat]1. Ventilation seat blower2.Ventilation seat unit Schematic diagrams Circuit DiagramConnector Pin Information Pin no Connector A Connector B Connector C 1Ventilation seat unit IGN 1 Ventilation heater power blower ground2Driver blower powerDriver heater power - 3Driver blower sppedPassenger heater power blower VSP4Driver RPM input- blower F/B5Illumination (+)Driver heater ground blower VCC6-Driver ventilation heater ground 7CAN LowDriver ventilation power8CAN High- 9- - 10LIN- 11- Passenger heater ground12Driver blower groundVentilation heater ground13Ventilation seat unit IGN 1 14Passenger blower power15Passenger blower speed16Passenger blower RPM input 17Illumination (-)18Detent19-20Driver NTC (+) 21Passenger NTC (+) 22Passenger NTC (-) 23Driver NTC (-) 24Passenger blower ground Repair procedures Removal[Ventilation Blower]1.
Other information:
Hyundai Elantra (CN7) 2021-2026 Service Manual: Photo Sensor
Description and operation Description 1.The photo sensor is located at the center of the defrost nozzles.2.The photo sensor contains a photovoltaic (sensitive to sunlight) diode. The solar radiation received by its light receiving portion, generates an electromotive force in proportion to the amount of radiation received which is transferred to
Hyundai Elantra (CN7) 2021-2026 Service Manual: Warning Indicator
Components and components location Components1. BSD Indicator2. Side repeater lamp Repair procedures Inspection1.Disconnect the negative (-) battery terminal.2.Remove the front door trim.(Refer to Body - "Front door trim")3.Disconnect the power door mirror connector from the harness4.
Categories
- Manuals Home
- Hyundai Elantra Owners Manual
- Hyundai Elantra Service Manual
- Drive Mode
- Instrument Panel Overview
- Driver assistance system
- New on site
- Most important about car
