Hyundai Elantra: Front Door / Repair procedures
Hyundai Elantra (CN7) 2021-2025 Service Manual / Body (Interior and Exterior) / Front Door / Repair procedures
| Adjustment |
Glass Adjustment
|

| 1. | Remove the front door trim. (Refer to Front Door - "Front Door Trim") |
| 2. | Separate the mounting plug hole (A) from the front door module.
|

| 3. | After loosening the glass mounting bolts, adjust the spacing of the glass (A) by moving the glass from side to side and then tighten the bolts.
|
| 4. | Check the glass for normal operation. |
Door Striker Adjustment
| 1. | After loosening the mounting screw, adjust the striker (A) by moving it forward and backward or from side to side and then tighten the bolts (B).
|
| 2. | Tap on the striker with a plastic hammer to adjust the striker. The striker will not move much, but will give some adjustment. |
| 3. | Hold the outer handle out, and push the door against the body to be sure the striker allows a flush fit. If the door latches properly, tighten the screws and recheck. |
Door Position Adjustment
| 1. | Check that the door and body edges are parallel.
|
| 2. | Place the vehicle on a level surface before adjusting the doors. |
| 3. | Adjust the hinges (A) : - Loosen the door mounting bolts slightly, and move the door in or out until it flush with the body. - Loosen the hinge mounting bolts slightly, and move the door backward or forward, up or down as necessary. - Place a shop towel on the jack to prevent damage to the door when adjusting the door.
|
| 4. | Grease the pivot portions of the hinges indicated. |
| 5. | Check for water leaks. |
 Components and components location
Components 1.Front door trim 2. Front door quadrant inner cover3. Front door belt inside weatherstrip4. Front door module5. Front door belt outside weatherstrip6...
 Front Door Trim
Components and components location
Component Location 1. Front door trim
Repair procedures
Replacement
•
When removing with a flat - tip screwdriver or remover, wrap protective tape around the tools to prevent damage to components...
Other information:
Hyundai Elantra (CN7) 2021-2025 Owner's Manual: Front Seats
WARNING Take the following precautions when adjusting your seat: NEVER attempt to adjust the seat while the vehicle is moving. The seat could respond with unexpected movement and may cause loss of vehicle control resulting in an accident...
Hyundai Elantra (CN7) 2021-2025 Service Manual: Rear Glass Defogger Printed Heater
Repair procedures Inspection • Wrap tin foil around the end of the voltmeter test lead to prevent damaging the heater line. Apply finger pressure on the tin foil, moving the tin foil along the grid line to check for open circuits...
Categories
- Manuals Home
- 7th Gen Hyundai Elantra Owners Manual
- 7nd Gen Hyundai Elantra Service Manual
- Rear Seats
- Engine Oil
- Body Electrical System
- Integrated Thermal Management Module (ITM)
- Fuel gauge
Tachometer
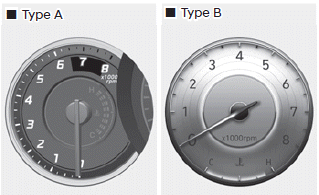
The tachometer indicates the approximate number of engine revolutions per minute (RPM).
Use the tachometer to select the correct shift points and to prevent lugging and/ or over-revving the engine.
NOTICE
Do not operate the engine within the tachometer's RED ZONE. This may cause severe engine damage.

Copyright © 2025 www.helantra7.com