Hyundai Elantra: Air Conditioning System / A/C Pressure Transducer
Hyundai Elantra (CN7) 2021-2025 Service Manual / Heating, Ventilation and Air Conditioning / Air Conditioning System / A/C Pressure Transducer
Description and operation
| Description |
The A/C Pressure Transducer (APT) converts the pressure value of high pressure line into voltage value after measuring it. By converted voltage value, engine ECU controls the cooling fan by operating it high speed or low speed. Engine ECU stops the operation of the compressor when the temperature of refrigerant line is very high or very low irregularly to optimize air conditioning system.
Repair procedures
| Inspection |
|

| 1. | Turn the ignition switch OFF. |
| 2. | Install the refrigerant recovery/recycling/charging system. (Refer to Air Conditioning System - "Repair procedures") |
| 3. | Turn ON the ignition switch, put into operation the air conditioner. |
| 4. | Calculate the reference voltage of the Recovery/Recycle/Recharge machine high pressure value using the formula below.
|
| 5. | Measure the sensor output voltage between terminal "1" and "2".
|
| 6. | If the reference voltage value and the sensor output voltage value are close to each other, the air conditioner pressure transducer is normal. |
| 7. | If 0V is output or the reference voltage value and sensor output voltage value are not close to each other, replace the air conditioner pressure transducer.
|

| Replacement |
| 1. | Disconnect the negative (-) battery terminal. |
| 2. | Recover the refrigerant with a recovery/charging station. |
| 3. | Disconnect the A/C pressure transducer connector (A).
|
| 4. | Remove the A/C pressure transducer (A).
|

| 5. | To install, reverse the removal procedure.
|
 Receiver-Drier
Repair procedures
Replacement1.Remove the condenser.2.Remove the cap (A) on the bottom of the condenser with a L wrench. Tightening torque : 9...
 Evaporator Temperature Sensor
Description and operation
DescriptionThe evaporator temperature sensor will detect the evaporator core temperature and interrupt compressor relay power in order to prevent evaporator from freezing by excessive cooling...
Other information:
Hyundai Elantra (CN7) 2021-2025 Owner's Manual: High beam operation
To turn on the high beam headlamp, push the lever away from you. The lever will return to its original position. The high beam indicator will light when the headlamp high beams are switched on. To turn off the high beam headlamp, pull the lever towards you...
Hyundai Elantra (CN7) 2021-2025 Service Manual: Canister
Repair procedures Removal1.Turn the ignition switch OFF and disconnect the negative (-) battery cable. 2.Disconnect the vent hose (A).3.Remove the fuel tank air filter (A) by rotating it 30 degrees.4.Disconnect the vapor hose quick-connectors (A).5...
Categories
- Manuals Home
- 7th Gen Hyundai Elantra Owners Manual
- 7nd Gen Hyundai Elantra Service Manual
- Function settings
- Forward Collision–Avoidance Assist (FCA) (sensor fusion)
- Instrument Panel Overview
- System operation
- Body Electrical System
Tachometer
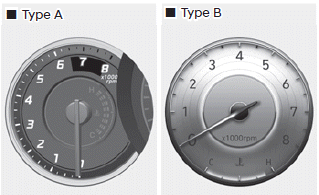
The tachometer indicates the approximate number of engine revolutions per minute (RPM).
Use the tachometer to select the correct shift points and to prevent lugging and/ or over-revving the engine.
NOTICE
Do not operate the engine within the tachometer's RED ZONE. This may cause severe engine damage.

Copyright © 2025 www.helantra7.com