Hyundai Elantra (CN7): Lighting System / Rheostat
Components and components location
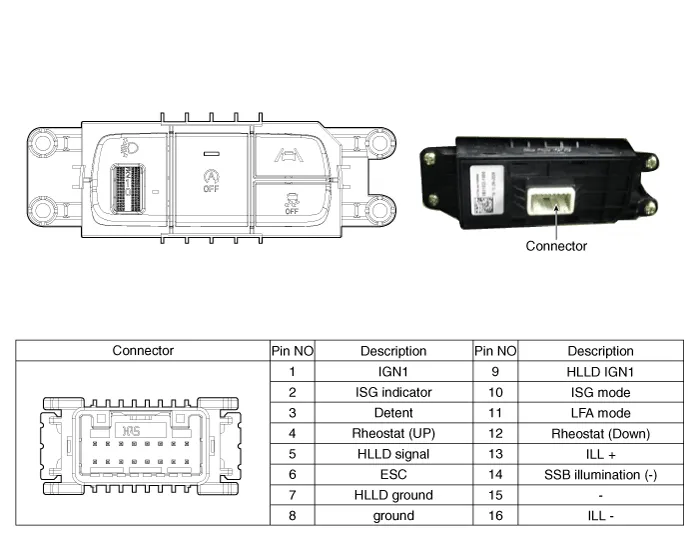
| Components |
Repair procedures
| Replacement |
| 1. | Disconnect the negative (-) battery terminal. |
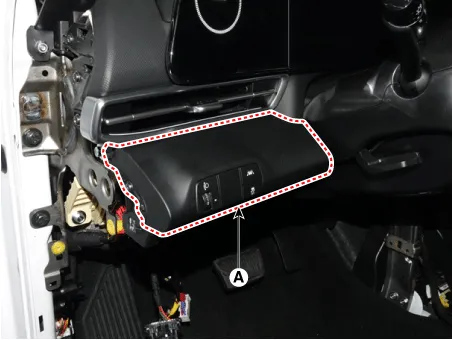
| 2. | Remove the crash pad lower panel (A). (Refer to Body - "Crash Pad Lower Panel") |
| 3. | Loosen the mounting screw and remove the crash pad lower switch (A).
|
| 4. | Disconnect the crash pad lower switch connector (A).
|

| 5. | To install, reverse the removal procedure. |
Repair procedures Removal1.Disconnect the negative (-) battery terminal.2.Remove the crash pad airvent [RH].(Refer to Body - "Crash Pad Airvent")3.Loosen the mounting screws and remove the harzard lamp switch (A).
Repair procedures Removal1.Disconnect the negative (-) battery terminal.2.Remove the front bumper.(Refer to Body - "Front Bumper Cover")3.Remove the head lamp.
Other information:
Hyundai Elantra (CN7) 2021-2026 Service Manual: Temperature Control Actuator
Description and operation DescriptionThe temperature control actuator is located at the heater unit. It regulates the temperature by the procedure as follows. The signal from the control unit adjusts the position of the temperature door by operating the temperature switch.
Hyundai Elantra (CN7) 2021-2026 Service Manual: Components and components location
C
Categories
- Manuals Home
- Hyundai Elantra Owners Manual
- Hyundai Elantra Service Manual
- Body (Interior and Exterior)
- Vehicle Information
- Engine Control / Fuel System
- New on site
- Most important about car

Copyright © 2026 www.helantra7.com - 0.0202