Hyundai Elantra: Engine Control System / Electric WGT Control Actuator
Hyundai Elantra (CN7) 2021-2025 Service Manual / Engine Control / Fuel System / Engine Control System / Electric WGT Control Actuator
Description and operation
| Desrcription |
The Electric Waste Gate Actuator(EWGA) is installed on the turbocharger. EWGA operates vain in west gate turbocharger and controls the compressed air by PWM signal of ECM.

Specifications
| Specification |
EWGA Position Sensor [integrated into EWGA]
|
Position
|
Output Voltage [V]
|
Operating Angle [°]
|
Range [mm]
|
| Mechanical Closed Position | 4.8 | 1 | 0 |
| Electrical Closed Position | 4.2 | 12 | 1.8 |
| Electrical Open Position | 1 | 79 | 16 |
| Mechanical Open Position | 0.5 | 90 | 19 |
EWGA DC Motor [integrated into EWGA]
|
Item
|
Specification
|
| Coil Resistance (Ω) | 28.3 - 31.1 [20°C (68°F)] |
Schematic diagrams
| Circuit Diagram |
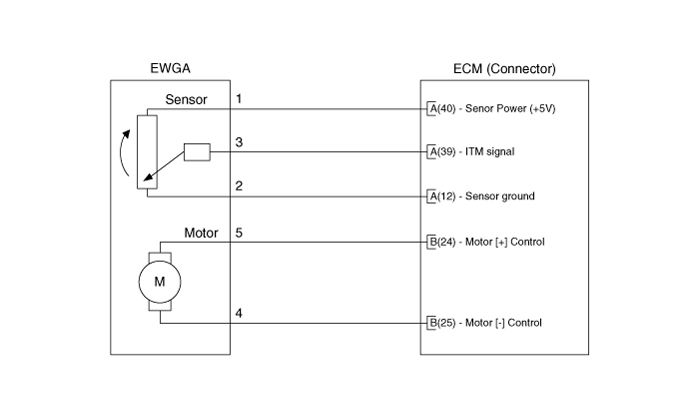
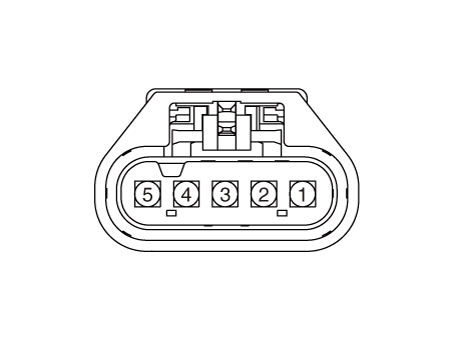
Harness Connector
Repair procedures
| Removal |
| 1. | Turn the ignition switch OFF and disconnect the battery negative (-) cable. |
| 2. | Remove the air cleaner assembly. (Refer to Engine Mechanical System - "Air Cleaner") |
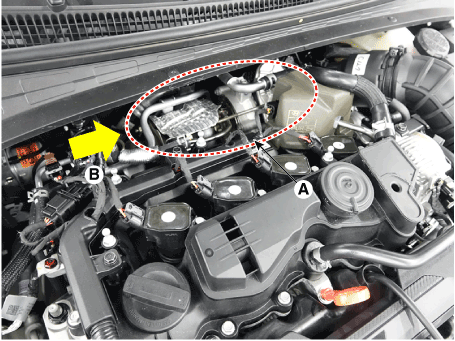
| 3. | Remove the intercooner inlet pipe. (Refer to Engine Mechanical System - "Intercooler") |
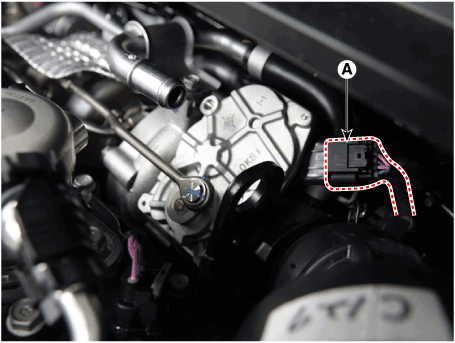
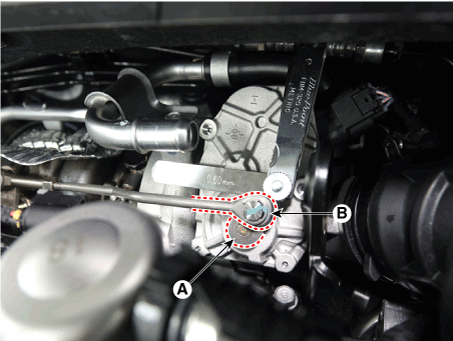
| 4. | Disconnect the EWGA connector (A).
|
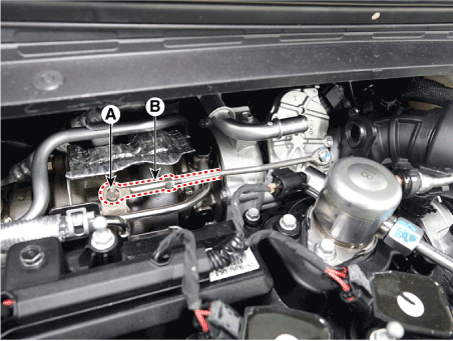
| 5. | Remove the shaft link assembly (B) after removing the C-ring (A).
|
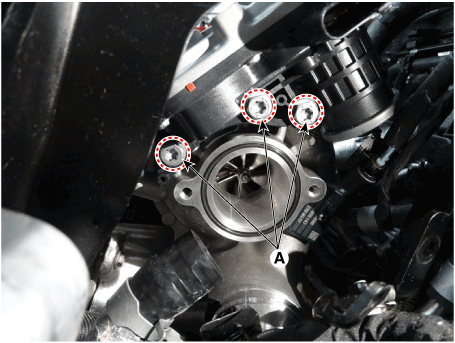
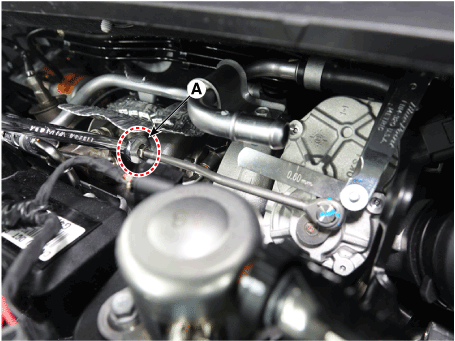
| 6. | Remove the EWGA after removing the bolts (A).
|
| Installation |
|

| 1. | Install in the reverse order of removal. |
| Adjustment |
[Rod Adjustment Procedure Flowchart]
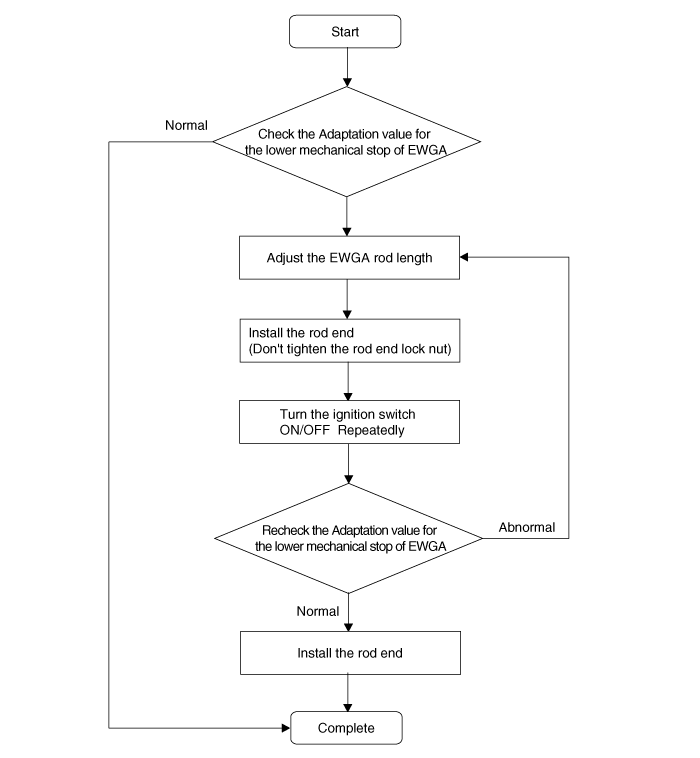
| 1. | Check that the waste gate turbo charger is coolenough to work.
|

| 2. | Turn the ignition switch to OFF position. |
| 3. | Connect the diagnostic tool to DLC connector (16pin) under the driver side instrument panel. |
| 4. | Turn the ignition switch ON.
|

| 5. | Select VIN or Vehicle on the initial screen. |
| 6. | Enter "Engine Control" menu after slelecting vehicleinformation (Vehicle model, Model year, Engine type)or entering the VIN number. |
| 7. | Select the "Current Data". |
| 8. | Without starting the engine, repeatedly turn theignition ON for 5 seconds and OFF for 5 seconds,and then check the "Adaptation value for lowmechanical stop of EWGA" on the diagnostic tool. Repeat this step until the amount of difference in theadaptation value from the previous cycle is below 0.05V.
|
| 9. | Check that "Adaptation value for the lower mechanical stop of EWGA" is within the specified voltage value.
|
| 10. | If the measured voltage value is not within the specified voltage value, adjust the EWGA rodlength. Otherwise, no further procedure is required.
|

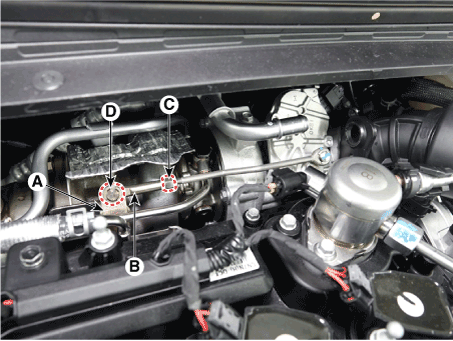
| 11. | Install the rod end (B) to the turbocharger lever (A) temporarily. Do not tighten the rod end lock nut (C) and C-ring (D).
|
| 12. | Check the "Adaptation value for the lower mechanical stop of EWGA" after selecting "Current Data" menu. Turn the ignition switch ON/OFF repeatedly until the changing value of the "Adaptation value for the lower mechanical stop of EWGA" is within 0.05V.
|
| 13. | If the measured voltage value is not within the specified voltage value, repeat procedures 9 - 12 until the voltage value is within the specified voltage value. |
| 14. | If it is within the specified voltage value, install the rod end to the turbocharger lever.
|
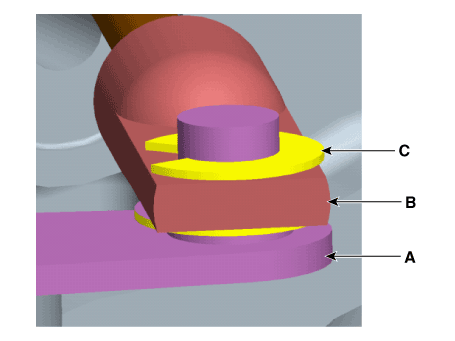
| 15. | Install the 0.6mm filler gauge between EWGA lever (A) and rod end (B).
|
| 16. | Tighten the lock nut (A).
|
 Fuel Pressure Control Valve (FPCV)
Description and operation
DescriptionInstalled on the high pressure fuel pump, the Fuel Pressure Regulator Valve controls the fuel amount flowing into the injectors in accordance with the ECM signal calculated based on various engine conditions...
 RCV Control Solenoid Valve
Description and operation
DescriptionRCV (Recirculation Valve) Control Solenoid Valve is installed on the intercooler inlet pipe and operates the RCV actuator which controls the by-pass passage of the turbocharger compressor...
Other information:
Hyundai Elantra (CN7) 2021-2025 Service Manual: Heater Core
Repair procedures Replacement1.Disconnect the negative (-) battery terminal. 2.Remove the heater and blower assembly.(Refer to Heater - "Heater Unit") 3.Remove the heater core cover (A) after loosening the mounting screws.4.Pull out the heater core (A) from the heater unit...
Hyundai Elantra (CN7) 2021-2025 Service Manual: Description and operation
Warning Lamp ActivationThe airbag system control module detects the presence or absence of an airbag system when power is supplied and turns on the airbag warning lamp.1.When the airbag system is normalWhen the airbag system is normal, the airbag warning light turns on for 6 seconds and then goes out...
Categories
- Manuals Home
- 7th Gen Hyundai Elantra Owners Manual
- 7nd Gen Hyundai Elantra Service Manual
- Maintenance
- Recommended Lubricants and Capacities
- Integrated Thermal Management Module (ITM)
- System operation
- Engine Compartment
Function malfunction and limitations
Function malfunction
.png)
When High Beam Assist is not working properly, the ‘Check High Beam Assist (HBA) system’ or ‘Check HBA (High Beam Assist) system’ warning message will appear and warning light will illuminate on the cluster. Take your vehicle to an authorized HYUNDAI dealer and have the function checked.

Copyright © 2025 www.helantra7.com