
Hyundai Elantra (CN7): Rear Door / Rear Door Side Weatherstrip
Repair procedures
| Replacement |
| [Rear door side weatherstrip] |
| 1. | Loosen the rear door checker (B) mounting bolt.
|
| 2. | Detach the clips, then remove the rear door side weatherstrip (A).
|
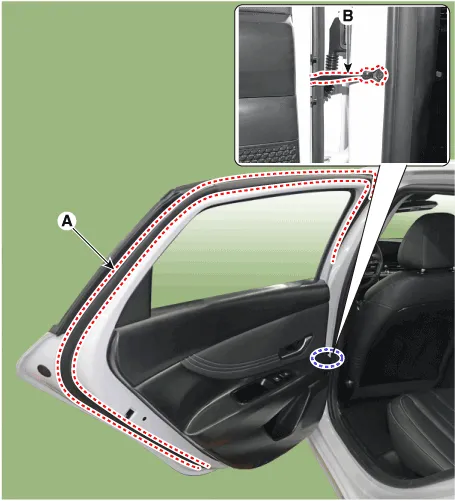
| 3. | To install, reverse the removal procedure.
|

| [Rear door body side weatherstrip] |
| 1. | Detach the clips, then remove the rear door body side weatherstrip (A). [LH]
[RH]
|


| 2. | To install, reverse the removal procedure.
|

Repair procedures Replacement1.Remove the rear door trim.(Refer to Rear Door - "Rear Door Trim")2.Remove the rear door belt inside weatherstrip (A).
Components and components location Component Location 1. Rear door latch Repair procedures Replacement1.Remove the rear door module.(Refer to Rear Door - "Rear Door Module")2.
Other information:
Hyundai Elantra (CN7) 2021-2026 Service Manual: Temperature Control Actuator
Description and operation DescriptionThe temperature control actuator is located at the heater unit. It regulates the temperature by the procedure as follows. The signal from the control unit adjusts the position of the temperature door by operating the temperature switch.
Hyundai Elantra (CN7) 2021-2026 Service Manual: Auto Defoging Actuator
Description and operation DescriptionThe auto defogging sensor is installed on front window glass. The sensor judges and sends signal if moisture occurs to blow out wind for defogging. The air conditioner control module receives a signal from the sensor and restrains moisture and eliminates defog by the intake actuator, A/C, auto defogging actua
Categories
- Manuals Home
- Hyundai Elantra Owners Manual
- Hyundai Elantra Service Manual
- Engine Control / Fuel System
- Rear Seats
- Front Bumper
- New on site
- Most important about car
