
Hyundai Elantra (CN7): Fuel Delivery System / Release residual pressure in fuel line
| Release Residual Pressure in Fuel Line |
|

| 1. | Turn the ignition switch OFF and disconnect the battery (-) cable. |
| 2. | Remove the fuel pump fuse (A).
|
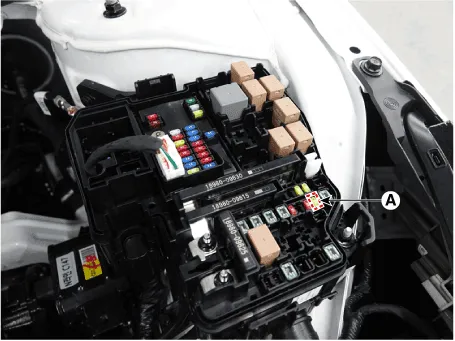
| 3. | Connect the battery (-) cable. |
| 4. | Start the engine and let idle, and then turn the ignition switch OFF after the engine has stopped on its own. |
| 5. | Disconnect the battery (-) cable, and then install the fuel pump fuse. |
| 6. | Connect the battery (-) cable. |
| 7. | Delete the Diagnostic Trouble Code (DTC) related the fuel pump fuse with the diagnostic tool.
|
Fuel Pressure Test1.Release the residual pressure in fuel line.(Refer to Fuel Delivery System - "Release Residual Pressure in Fuel Line") • When removing the fuel pump fuse, a Diagnostic Trouble Code (DTC) may occur.
Repair procedures Removal1.Release the residual pressure in fuel line.(Refer to Fuel Delivery System - "Release Residual Pressure in Fuel Line")2.Turn ignition switch OFF and disconnect the negative (-) battery cable.
Other information:
Hyundai Elantra (CN7) 2021-2026 Service Manual: Compressor
Description and operation DescriptionThe compressor is the power unit of the A/C system.It is located on the side of engine block and driven by a V-belt of the engine.The compressor changes low pressure and low temperature refrigerant gas into high pressure and high temperature refrigerant gas.
Hyundai Elantra (CN7) 2021-2026 Service Manual: Components and components location
C
Categories
- Manuals Home
- Hyundai Elantra Owners Manual
- Hyundai Elantra Service Manual
- Function settings
- Body Electrical System
- Front Radar Unit
- New on site
- Most important about car
