Hyundai Elantra (CN7): Trunk Lid / Trunk Lid Latch
Repair procedures
| Replacement |
|

|

| 1. | Remove the tail trunk lid trim. (Refer to Trunk Lid - "Trunk Lid Trim") |
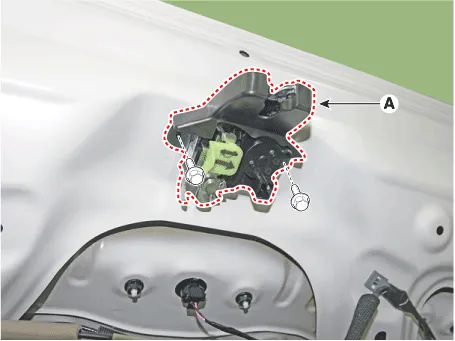
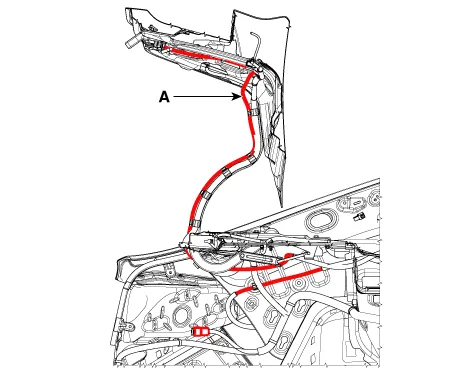
| 2. | Disconnect the connector (A) and cable (B).
|

| 3. | Loosen the mounting bolts and remove the trunk lid latch (A).
|
| 4. | To install, reverse the removal procedure.
|
| [Trunk lid cable] |
| 1. | Remove the front seat assembly. (Refer to Front Seat - "Front Seat Assembly") |
| 2. | Remove the rear seat assembly. (Refer to rear Seat - "Rear Seat Assembly") |
| 3. | Remove the floor console assembly. (Refer to Floor Console - "Floor Console Assembly") |
| 4. | Remove the center pillar lower trim. (Refer to Interior Trim - "Center Pillar Trim") |
| 5. | Remove the cowl side trim. (Refer to Interior Trim - "Cowl Side Trim") |
| 6. | Remove the luggage side trim. (Refer to Interior Trim - "Cowl Side Trim") |
| 7. | Remove the floor carpet. (Refer to "Floor carpet") |
| 8. | Remove the tail trunk lid trim. (Refer to Trunk Lid - "Trunk Lid Trim") |
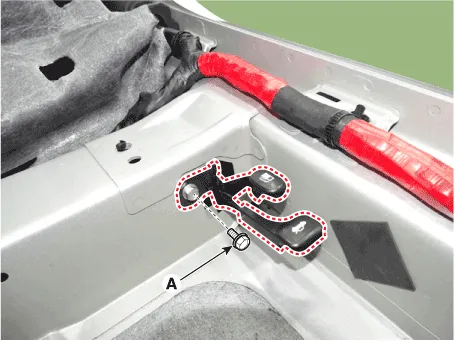
| 9. | Loosen the trunk lid catch mounting bolt (A).
|
| 10. | Detach the cable (A) and remove the trunk lid catch (B).
|
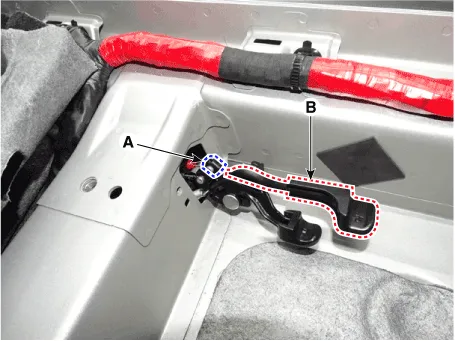
| 11. | Remove the cable (B) from the trunk lid catch (A).
|
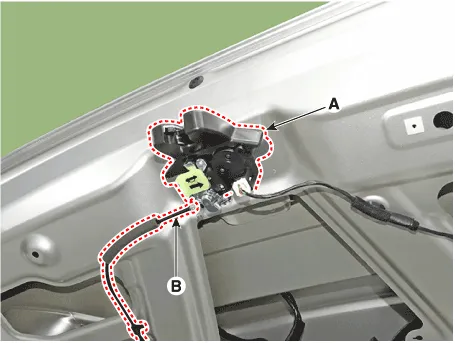
| 12. | Remove the trunk lid cable (A).
|
| 13. | To install, reverse the removal procedure.
|
| [Trunk lid catch] |
| 1. | Remove the front seat assembly [LH]. (Refer to Front Seat - "Front Seat Assembly") |
| 2. | Remove the front door scuff trim [LH]. (Refer to Interior Trim - "Front Door Scuff Trim") |
| 3. | Remove the cowl side trim [LH]. (Refer to Interior Trim - "Cowl Side Trim") |
| 4. | Remove the floor console assembly. (Refer to Floor Console - "Floor Console Assembly") |
| 5. | Separate the floor carpet to obtain space for removing the rear heating duct. |
| 6. | Loosen the trunk lid catch mounting bolt (A).
|
| 7. | Detach the cable (A) and remove the trunk lid catch (B).
|
| 8. | To install, reverse the removal procedure.
|
Components and components location Component Location 1. Trunk lid trim Repair procedures Replacement • When removing with a flat - tip screwdriver or remover, wrap protective tape around the tools to prevent damage to components.
Components and components location Component Location 1. Trunk lid back panel Repair procedures Replacement • When removing with a flat - tip screwdriver or remover, wrap protective tape around the tools to prevent damage to components.
Other information:
Hyundai Elantra (CN7) 2021-2026 Service Manual: Auto Lighting Control System
Description and operation DescriptionIt's a system that uses illumination sensor to automatically turn ON the tail lamp and head lamp based on the change in surrounding environment's illumination condition. It activates when the vehicle enters/exits tunnel, or when the illumination condition in surrounding environment changes due to rain, snow, or
Hyundai Elantra (CN7) 2021-2026 Service Manual: Auto Defogging Sensor
Description DescriptionThe auto defogging sensor is installed on the front window glass. The sensor judges and sends signal if moisture occurs to blow out wind for defogging. The air conditioner control module receives signal from the sensor and restrains moisture and eliminate defog by controlling the intake actuator, A/C, auto defogging actuat
Categories
- Manuals Home
- Hyundai Elantra Owners Manual
- Hyundai Elantra Service Manual
- Body Electrical System
- Instrument Panel Overview
- Specifications
- New on site
- Most important about car
