Hyundai Elantra: Dual Clutch Transmission Control System / Shift Lever
Components and components location
| Components |
| 1. Shift lever knob & boots assembly 2. Shift lever assembly 3. Shift cable | 4. Manual control lever 5. Shift cable retainer |
Repair procedures
| Removal |
| 1. | Turn OFF ignition switch and then diconnect the battery negative (-) cable. |
| 2. | Remove the shift lever knob & boots (A).
|
| 3. | Remove the floor console assembly. (Refer to Body - "Floor Console") |
| 4. | Remove the air duct (A) after loosening the bolts.
|
| 5. | Separate the shift cable (B) after removing the snap pin (A).
|
| 6. | Disconnect the connector (A) and wiring clip (B).
|
| 7. | Remove the shift lever (A) after loosening the mounting bolts.
|
| Installation |
| 1. | To install, reverse the removal procedure.
|


 Inhibitor Switch
Description and operation
Description•
The inhibitor switch is installed on top of transmission, and is connected to the shift lever through shift cable...
 Shift Cable
Components and components location
Components1. Shift lever knob & boots assembly2. Shift lever assembly3. Shift cable4. Manual control lever5. Shift cable retainer
Repair procedures
Removal1...
Other information:
Hyundai Elantra (CN7) 2021-2025 Service Manual: Components and components location
Component Location1. Windshield wiper arm & blade2. Wiper & washer switch3. Windshield washer hose & nolzzle4. Washer motor & linkage assembly5. Washer motor6. Washer reservoir7. Wiper/Washer relay (Built - in PCB block)..
Hyundai Elantra (CN7) 2021-2025 Service Manual: Clutch Cover And Disc
Repair procedures Removal1.Remove the manual transaxle assembly.(Refer to Manual Transaxle System - "Manual Transaxle")2. Remove the clutch cover assembly after loosening the bolts. • Be careful not to be bent or twist bolts. Loosen bolts in diagonal directions. [Gasoline 1.6 MPI / Gasoline 1.6 T-GDI] [Gasoline 2.0 MPI] Inspect..
Categories
- Manuals Home
- 7th Gen Hyundai Elantra Owners Manual
- 7nd Gen Hyundai Elantra Service Manual
- Control Cable
- Integrated Thermal Management Module (ITM)
- Fuel gauge
- Interior Overview
- Rear Seats
Air bag collision sensors
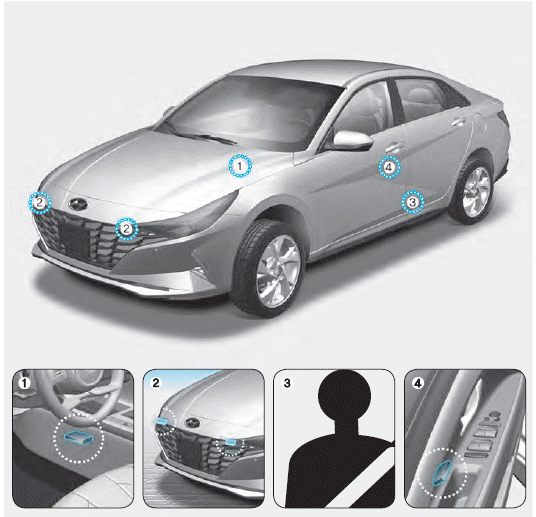
1. SRS control module/Rollover sensor
2. Front impact sensors
3. Side impact sensors (acceleration)
4. Side impact sensors (pressure)

Copyright © 2025 www.helantra7.com