Hyundai Elantra: Fender / Repair procedures
Hyundai Elantra (CN7) 2021-2025 Service Manual / Body (Interior and Exterior) / Fender / Repair procedures
| Replacement |
|

| 1. | Remove the front bumper. (Refer to Front Bumper - "Front Bumper Assembly") |
| 2. | Remove the head lamps. (Refer to Body Electrical System - "Head Lamps") |
| 3. | Remove the front wheel guard. (Refer to Body Side Molding - "Front Wheel Guard") |
| 4. | Remove the front bumper side mounthing bracket (A) after loosening the bolts.
|
| 5. | Loosen the mounting clips and remove the insulator cover (A).
|
| 6. | After loosening the mounting bolts, remove the fender assembly.
|
| 7. | To install, reverse the removal procedure.
|


 Hood
Hood
..
Other information:
Hyundai Elantra (CN7) 2021-2025 Service Manual: Front monitor
Components and components location Components Repair procedures Removal10.25" Cluster + 10.25" Monitor • Take care not to scratch the crash pad and related parts.• When removing with the screwdriver or remover, wrap the protective tape on the tools. • Be careful to store and handle the crash pad when..
Hyundai Elantra (CN7) 2021-2025 Service Manual: Hood Insulator Pad
Repair procedures Replacement • Be careful not to scratch the hood panel. 1.Using a clip remover, remove the clips and then the hood insulator pad (A).2.To install, reverse the removal procedure. • Replace any damaged clips (or pin - type retainers)...
Categories
- Manuals Home
- 7th Gen Hyundai Elantra Owners Manual
- 7nd Gen Hyundai Elantra Service Manual
- Integrated Thermal Management Module (ITM)
- Drive Mode
- System disabled
- Interior Overview
- Instrument Panel Overview
Tachometer
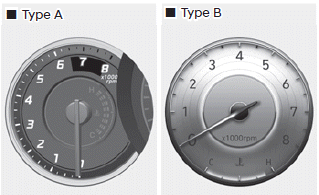
The tachometer indicates the approximate number of engine revolutions per minute (RPM).
Use the tachometer to select the correct shift points and to prevent lugging and/ or over-revving the engine.
NOTICE
Do not operate the engine within the tachometer's RED ZONE. This may cause severe engine damage.

Copyright © 2025 www.helantra7.com